Three Recipes That Have Changed My Life

Image may contain: text

As many of you know, cooking is not my favorite thing. This has not always been the case. In fact, there was a time in my life when I used to love cooking. That era was when I had the time to cook what I wanted and then actually sit down to eat and enjoy what I’d prepared. That era, my friends, ended nearly 9 years ago on October 27, 2010 (Also known as the day my first baby was born).

Somehow, though, I am still expected to cook 3 meals and 5,463 snacks every. Single. Day. That’s a lot of cooking for someone who has lost the joy of cooking.

But there is hope! I have a few go-to recipes that have changed my life. I rotate my favorite recipes with such precision that my family knows what day of the month it is purely by what is served on our dinner table. It’s a survival mechanism, and it works.

My criteria for an outstanding recipe are:
1. It is easy to make. We’re talking, so easy I can make this dish while simultaneously helping a kid with homework, assisting a preschooler to build a Duplo city, and breaking up a sibling fight.
2. Is it tasty enough that either:
A) at least 60% of my family will eat it.
Or
B) it’s so delicious that I won’t mind a bit if I have to eat the whole thing myself.

That’s it. I’m pretty easy to please (Motherhood has lowered my standards by a not-insufficient amount).

When I was thinking about what recipes I wanted to share with you here today, I was reminded of one of my favorite shows–Master Chef (I have no problem at all watching other people struggle in the kitchen.). For the grand finale of Master Chef the competitors must prepare a 3-course meal: appetizer, entree, and dessert.

So that is precisely what I will do for you today, my friends. Although I will be presenting 3 courses worth of recipes, I would not necessarily recommend eating them all together at the same meal. It would be a weird combo of foods, but I suppose anything is possible. Free country and everything.

And, since this is a free country, I’m going to start with my favorite course first: Dessert.

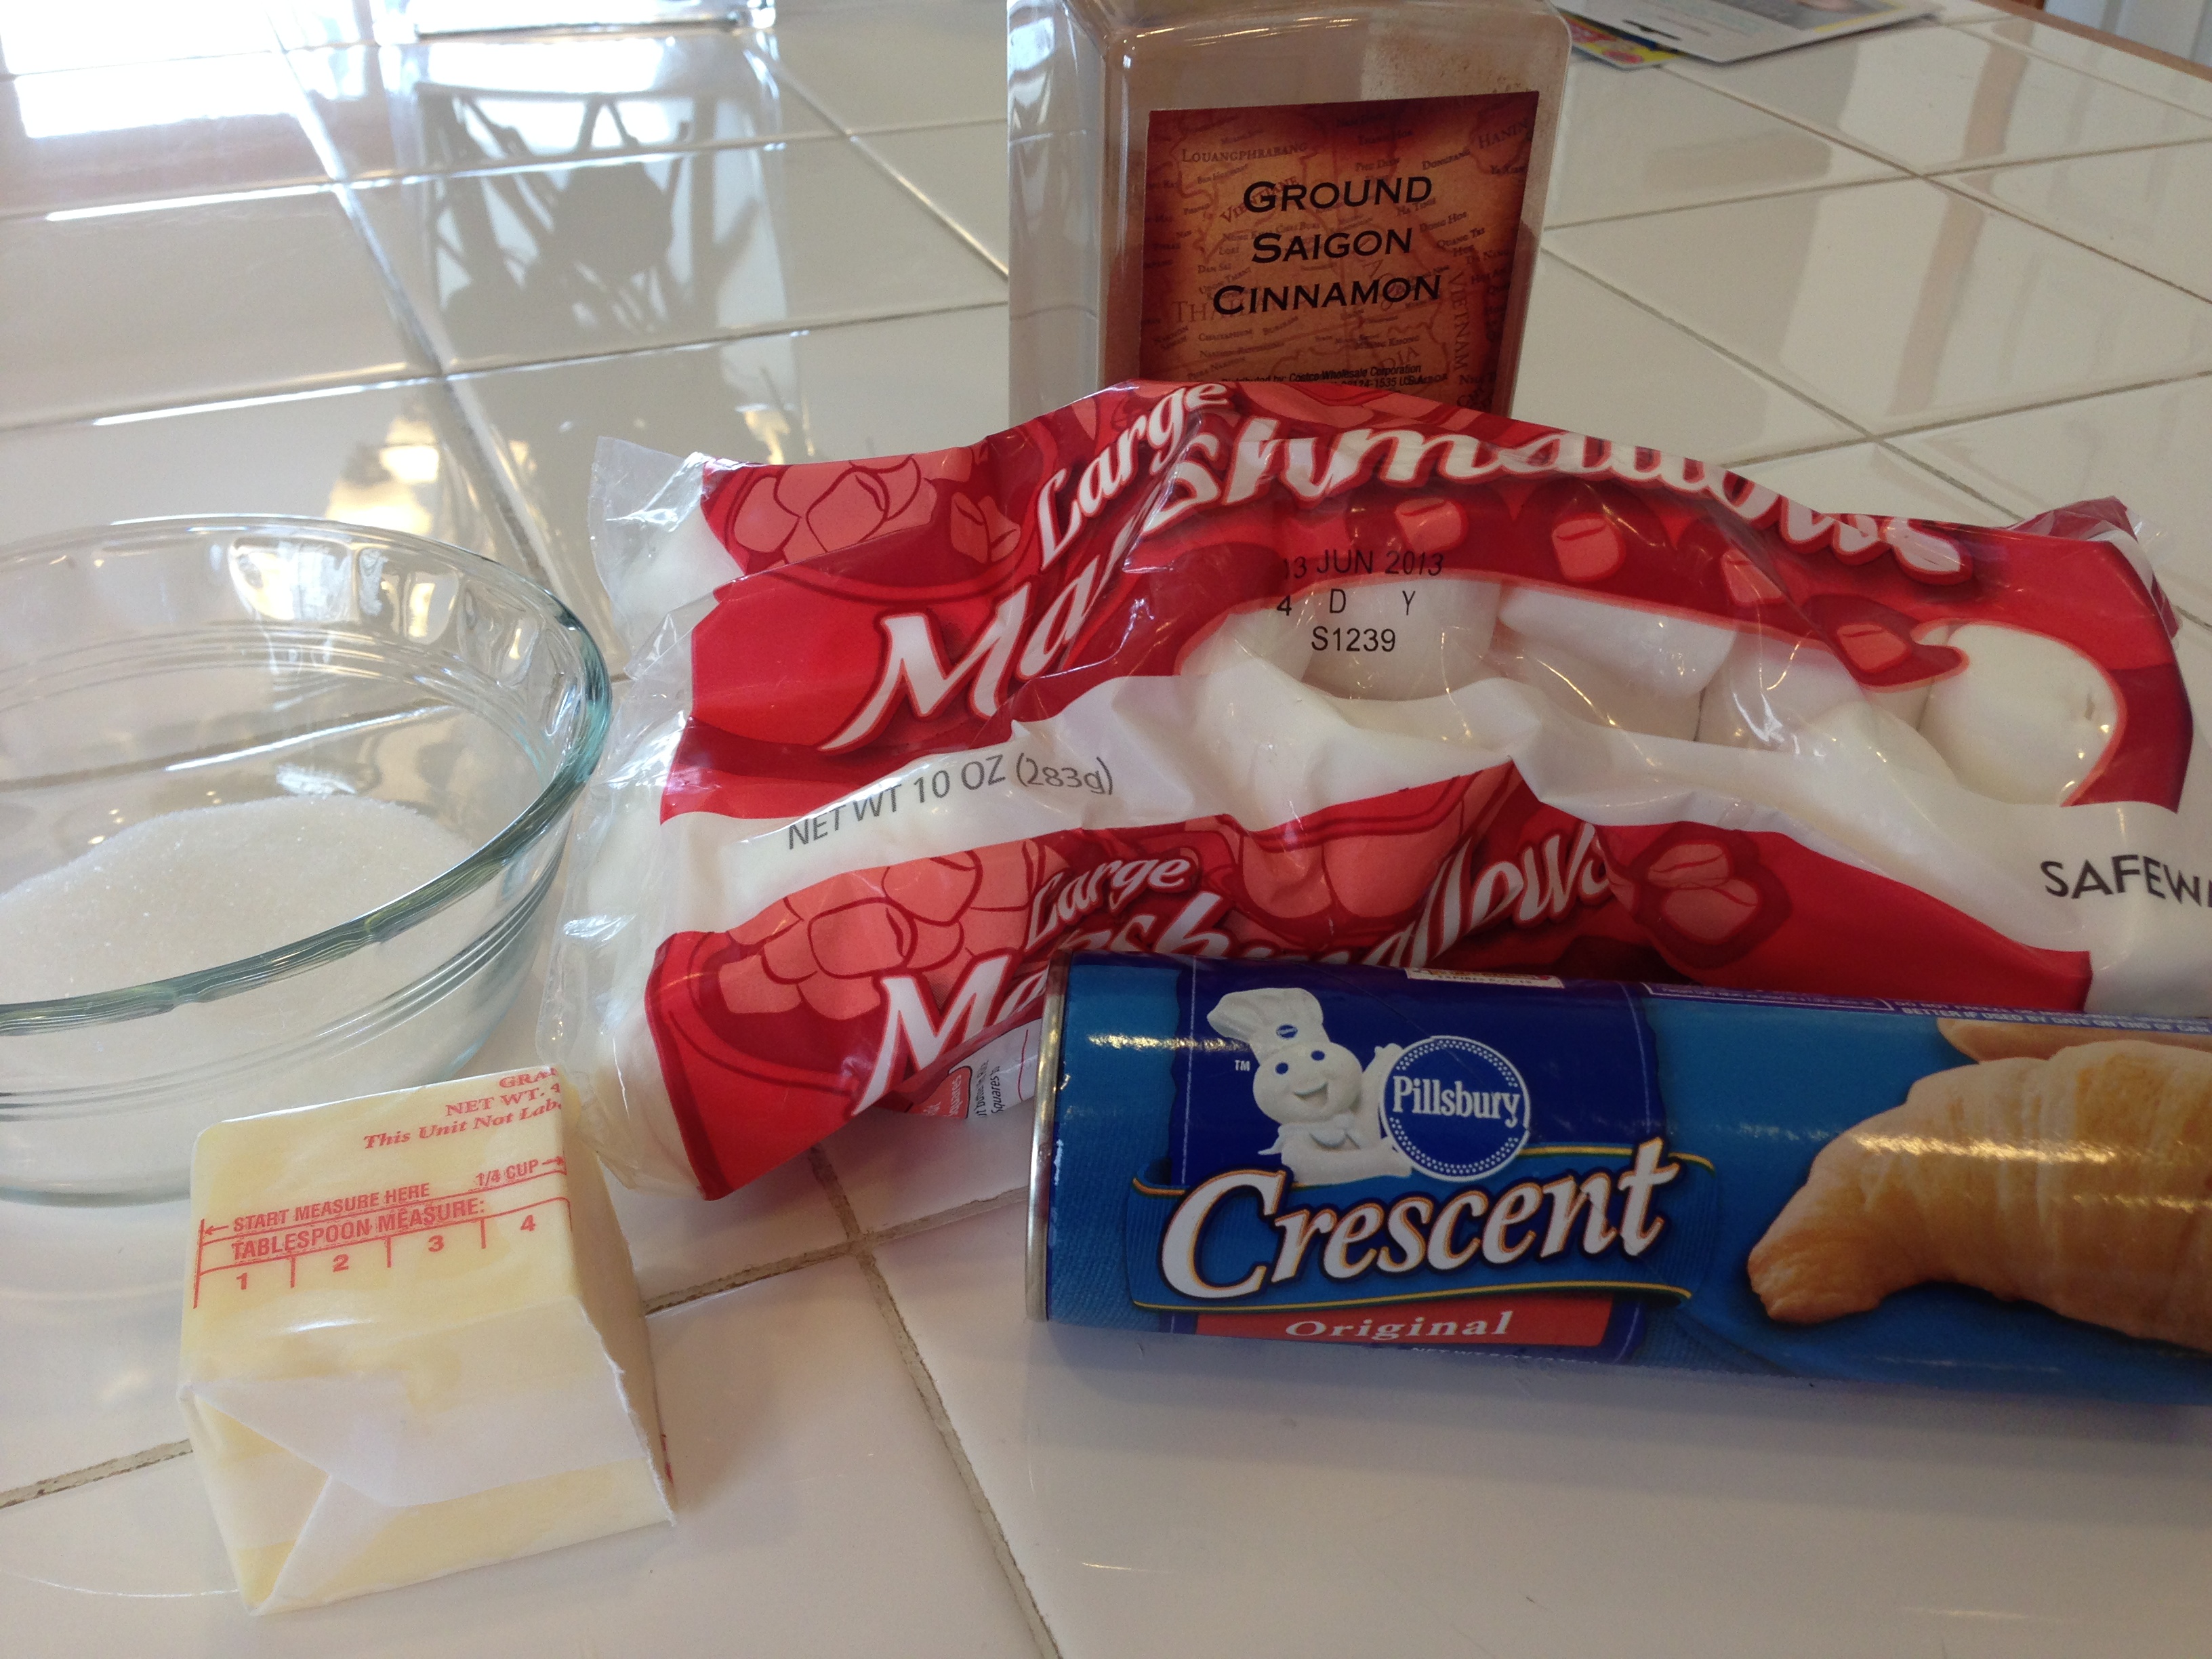
5-Minute Chocolate Mug Cake
AKA The Most Dangerous Cake Recipe In The World
Cake is by far my favorite meal of the day, so it’s only fitting that I would highlight a cake recipe for my dessert course.

Ingredients

  • 4 Tablespoons flour
  • 4 Tablespoons sugar
  • 2 Tablespoons cocoa powder (Get the good stuff here, folks. No off-brand Kroger Cocoa or similar rubbish. We’re looking for something along the lines of Ghiradelli or Godiva–go big or go home!).
  • 1 egg
  • 3 Tablespoons milk
  • 3 Tablespoons oil (vegetable, canola, whatevs…as long as it’s the edible kind of oil)
  • 3 Tablespoons chocolate chips (Optional. JK. Chocolate chips are never optional. If you want to succeed at life, definitely always add chocolate chips.)
  • A small splash of vanilla extract

Instructions

  1. Get a big ‘ol coffee mug. Make sure it is microwaveable. Otherwise you’ll make sparks in your kitchen, and I’m not talking about what you and your husband do after you put the kids to bed.
  2. Add dry ingredients to the mug and mix well.
  3. Add the egg and beat it like you’re Mike Tyson in the boxing ring.
  4. Pour in the milk and oil and mix well.
  5. Add chocolate chips. Now add a little extra. You’ll thank me later.
  6. Put your mug in the microwave and microwave for 2 minutes 30 seconds – 3 minutes. This is not an exact science. Well, maybe it is. But when I’m cooking chocolate cake in a mug in my microwave I don’t want to mess with the math of microwave watts and the volume of my mug or any of that mumbo-jumbo. Just watch your cake and take it out when it looks done-ish. If you like your cake moist, take it out earlier. If you like it really well-done and dry so you kill all of the salmonella or whatever, cook it longer.
  7. The cake might rise over the top of the mug while it’s cooking. DO NOT BE ALARMED! This, like toddler tantrums in a grocery store, is an expected part of life.
  8. Unless you enjoy the sensation of molten lava on your palette, allow your cake to cool a little bit before you dig in.
  9. EAT!!! Supposedly this dessert is meant to share, but I’ve never tested that theory.

Moving on, now. I’m rather enjoying the excitement of presenting these courses out of order, so let’s do something really crazy!

May I present Course 2: Appetizer

Pan-Roasted Vegetables
Seriously? Roasted vegetables as an appetizer?! Yes, vegetables are an appetizer. Just look in the “Starters” section of any fancy-by-millenial-standards restaurant and I guarantee you’ll find fried brussels sprouts. Roasted is just the healthier version of fried, and I’m oh-so-healthy (as indicated by Course 1 above). But seriously. These things are highly addictive and I almost always eat the whole pan myself.

Ingredients:

  • One big handful per person of a hearty vegetable (Broccoli, Asparagus, Brussels Sprouts, green beans, Potatoes, Carrots)
  • Olive Oil (the big jug from Costco works just fine)
  • Salt and Pepper
  • Finishing pizzazz (Varies depending on the veggie and the mood you’re in. Includes but is not limited to: squeeze of fresh lemon juice, balsamic glaze, honey, parmesan cheese, crumbled bacon)

Instructions

  • Preheat your oven to 400 degrees.
  • While your oven is getting ready to work some magic transforming bland produce into heavenly bites, rinse and pat dry your veggies.
  • Spread out your veggies on a large baking sheet with enough room between them so nobody is touching or passing along any cooties.
  • Douse the whole thing with Olive Oil. Don’t be too stingy here. We want enough oil that the veggies won’t get a sunburn, but they don’t need to swim in the stuff either.
  • Use your fingers to massage the oil into your veggies the same way (you wish) your husband would massage your back after you’ve had a long day of caring for his offspring.
  • Sprinkle some salt and pepper fairy dust all over those veggies.
  • Bake in the oven for 15-20 minutes. I use a very scientific method to determine when this dish is done. Jab a fork in one of the veggies after 10-15 minutes and if it’s hard as a rock, then it’s not done. If the fork goes in the way I would want my fork to go in when I’m eating it, then it’s done. If the vegetable is black like burnt vegetables, it is over done.
  • As soon as you take the tray out of the oven, spread some pizzaaz. My favorite combos are: broccoli + lemon juice + parmesan cheese, brussels sprouts + balsamic glaze, carrots + honey, green beans + bacon
  • Watch as your children refuse to touch the green stuff while you gorge yourself on a farmer’s market’s worth of vegetables in one sitting.

And, finally, the main event (or, in our case, the main course).

Panang Curry with Chicken, 3 Stars
Jon makes fun of me because any time we go out to eat I order the exact same thing. As in, if we go to restaurant X, I 100% will be ordering entreé Y. What can I say–I know what I like, and I like what I know. Thai food is my absolute favorite, and every time we eat at any Thai restaurant I order the Panang Curry with Chicken, 3 Stars. And since I can’t go to eat every day I have learned how to make a darn good copycat of my own.

Ingredients

  • 1 pound boneless skinless chicken breasts, thinly sliced
  • A splash of vegetable oil
  • Panang Curry Paste (Just buy the good stuff on Amazon and save yourself a trip to a grocery store that probably won’t have it anyway).
  • 1 can coconut milk (Not coconut creme, that’s for your piña coladas…which, coincidentally, would go quite well with this dish…)
  • 1-2 Tablespoons peanut butter (Unless you’re allergic to peanuts, in which case I bid you adieu.)
  • 1-2 Tablespoons brown sugar (Or, if you’re not a sugar addict like me, 0 Tablespoons of brown sugar)
  • 1-2 Tablespoons fish sauce (Ewwww! Right?! I hate fish more than probably anyone else on the planet, so trust me when I say that this stuff will not make your curry taste like the ocean. It adds salty flavor, that’s it. Start with just a splash in your curry if you don’t trust it, and see what you think. Again, Amazon to the rescue.)
  • (optional) 1-2 teaspoons lime leaf powder (I don’t think this stuff is totally necessary, but it does taste good and it makes me feel fancy when I see lime leaf powder in my spice cabinet).
  • 1/2 red bell pepper thinly sliced
  • 1/2 green bell pepper thinly sliced
  • 1 small handful of frozen haricot vert (Fancy words for the skinny green beans)
  • 1/2 cup fresh diced pineapple if you have it (Really, you don’t need to buy a whole pineapple for this recipe just so you can throw a few chunks into your curry.)
  • For serving: Cooked rice

Instructions

  • In a wok (1st choice) or large pan (2nd choice), brown your chicken in the vegetable oil. If you’re going to be saving out some of the chicken to feed plain to your picky children, then make sure it’s cooked throughly. Or, if you’re adding the whole batch of chicken directly to your curry, you can even just skip this step entirely.
  • Remove chicken from the pan.
  • In the same pan add the curry paste (Hint: more = SPICIER! 3 stars–medium/hot–is about 1-2 Tablespoons of curry paste. Start by adding just a bit and then add more if you want it spicier), coconut milk, peanut butter, brown sugar, and fish sauce, and lime leaf powder. Heat on medium until you get a nice simmer going and everything melts together.
  • Add the chicken (if you didn’t already cook the chicken, simmer for about 20 minutes until the chicken is totally cooked through). Now would be a good time to make that piña colada. This is also a good time for you to prepare your picky kids’ not-curry dinners.
  • Add whatever veggies you want to use and simmer for another 5 minutes, until your veggies are softened but not mushy.
  • Serve over cooked rice.

That’s it! Three of the simplest and most delicious courses of food you’ll ever prepare. I hope I’ve un-inspired you to cook this week and always. Enjoy creating in your own kitchen (and if all else fails, there’s always Grub Hub!).

Kid Food and Adult Beverage Pairings

wine-and-cheese-pairing-guide-2

Every mom I know inevitably ends up on The Mom Diet at some point in her motherhood career. You know, the diet that consists of eating your kids’ leftovers while standing at the kitchen sink. We’ve all been there, and there’s no shame in it. Just as going into public with spit-up and/or puke and/or poop on your clothing is a rite of passage for mothers, so too is The Mom Diet.

Let’s just call it like it is, and embrace this manic-depressing form of eating. I think we could make The Mom Diet a lot more fun if we just added the correct beverages as a compliment to the dining experience. Fine cheeses have wine pairings, and I don’t see why stale chicken nuggets shouldn’t garner the same respect. Here are a few of my suggested kid food and adult beverage pairings:

Cold Mac ‘N Cheese
This is your basic cheese and wine pairing. A crisp white wine like Pinot Grigio or Sauvignon Blanc will compliment the mild, tangy flavors of the chilled Mac ‘N Cheese. This pairing is best enjoyed with Mac ‘N Cheese straight out of the pan that is still sitting on your stove, and wine served in your toddler’s sippy cup.

Hot Dog Pieces
One of the first rules you’ll master when learning how to pair food with a beverage is that salt loves sweet! The salt in the hot dog will heighten the perception of sweetness in your beverage, so go for an ice wine or, if you’re feeling exotic, a margarita.

PB&J Sandwich Crusts
The residual nutty flavor of the peanut butter and the sweet tang of the jelly pair beautifully with the zing of a fresh bubbly. Try Prosecco or, if you’re looking for something a bit more special, go for Champagne. If your child eats PB&J for breakfast like mine do, you can even mix your Champagne with OJ for the perfect morning Mimosa.

Pulverized Pretzel Bits
What grows together goes together! Since pretzels basically grow in the beer gardens of Germany, a nice hoppy Hefeweizen will pair beautifully. Turn on some polka music and you’ll be transported to another world!

Half-Eaten Fish Sticks
Thanks to the smoky notes and fatty texture of whitefish (fish sticks), the dish can totally stand up against a light red, like an earthy Pinot Noir from Burgundy. Pinot also does an excellent job of masking underlying flavors of freezer burn or actual burning from your oven.

Fruit Snacks Found Between The Couch Cushions
The bright, concentrated flavors of fruit snacks are the perfect match for the bold flavors of a rich Zinfandel. Just don’t spill red wine on the couch when you’re digging around for more fruit snacks, because perma-stains.

Pizza “Bones” (Pizza Crust)
If you get to the point where you’re actually eating the bum-end of the formerly-most-glorious food group, then you need something stronger than your childrens’ resolve to cover every square inch of your home in Legos and/or Barbie shoes. Try bourbon on the rocks…or straight out of the bottle. Remember, no judgment here.

Bon appétit!

10 Tips For Bringing Meals To Families In Need

photo (10)

When I came home from the hospital after having my first baby I was a bit overwhelmed. Two days earlier I had left my home with my husband and now we were returning with our souvenir: a person. A person who I had to feed and keep clean and allow to sleep while I was awake and tend to when I’d rather be sleeping. For those first few weeks I felt like all I did was breastfeed my baby and try not to think about how much every inch of my body hurt in new and unusual ways. Doing anything productive–cooking, cleaning, walking by myself to the bathroom–was out of the question.

I was beyond grateful, then, when several friends offered to bring us meals during those first few weeks home. Not only did I not have to cook dinner each night, but I didn’t even have to think about it. Nor did my husband. The food just magically appeared, we woke up from our delirium long enough to eat it, and then we fell back into our new-parents trance.

Fast forward four years, and now it’s my turn to pay it forward. Any time we know someone who is in need–whether they’ve just had a baby, are coming home from a surgery, or are suffering from a loss–we try to return the favor. Bringing someone food during their time of need is a simple, yet impactful way of showing them that you care. I’ve prepared dozens of meals for families in need (and have received dozens of meals from our gracious friends) over the years. I’ve picked up a few tips along the way for bringing meals that will bless others. Here are my top 10:

1. Eat one/ Share one
Why make extra work for yourself? Rather than making a special meal to bring to someone, just make a double batch of whatever you’re planning for your own family. Then bring the second serving to the person in need.

2. Make It Freezable
Make a dish that can be easily frozen and reheated if they don’t want to eat it right now. The person you are cooking for may want to save your meal for another time–maybe they aren’t very hungry tonight, or they actually have the energy to cook right now, or their fridge is already full of leftovers from the other people who have been bringing them food. If you give them the option to freeze your meal, then it’s a gift that can be given (er…eaten…) whenever the time is right for them. Check out these 24 freezable meals if you need some inspiration.
*If you do make something that can be frozen, be sure inform the recipient of this fact. Also include instructions on how to cook or reheat the meal from frozen.

3. Stick To The Basics
This is not the time to try some fancy new recipe or see what happens if you dump the entire jar of Cayenne Pepper into the soup. Cook something tried-and-true so you aren’t left scrambling at the last minute if it doesn’t work out. Make something that people with “average” palates could appreciate, especially if there are children in the family who will be sharing the meal. Also, be sure to ask the recipient in advance if they have any allergies, intolerances, or food preferences.

4. Include Your Recipe
On the off-chance that your friend really likes the food your bringing her, she may want to make it again. I always include a copy of the recipe I have prepared–if nothing else, maybe she can add it to her baby’s memory book so they can look back and remember what Mom and Dad ate while they were recovering from newborn-itis. Along with this, I always write down directions for heating/reheating the meal I’ve prepared–especially how long it will take for the food to cook.

5. NO DISHES!!!
My least favorite part of cooking is certainly not the cooking. No, it’s the dishes. Those dang dishes that pile up after every meal. So, when I’m trying to help out a friend in need, I make sure they don’t have to wash a single dish. I buy foil baking dishes, Tupperware containers, Ziploc bags and paper plates when they’re on sale so I have them on hand whenever I want to bring someone a meal. When I drop off a meal I tell the recipient that I don’t want any of it back–they can clean ’em and keep ’em or just throw them away. Done deal.

6. Don’t Forget The Extras
If I’m going to all the effort of making someone a nice meal, I want it to be…nice. That means a bottle of wine or sparkling cider. Extra sauce. Some flowers for their table. DESSERT. It’s the little things that make a difference.

7. Let Others Do The Cooking
Restaurant takeout, pizza delivery, ready-made meals from the grocery store, take-and-bake pizzas, even grocery delivery are all great options. Plus, the best part about letting somebody else do the cooking is that you can use this option remotely and still have food delivered on your behalf. Even though we live thousands of miles away, we’ve been able to send food to several friends in Seattle this year by ordering them pizzas or having Safeway drop off some groceries at their home.

8. Coordinate Meal Delivery
There are several websites out there that make coordinating meal deliveries easy. You can include all of the pertinent information–the recipient’s name, address, directions to their house, phone number, dietary restrictions, best times for food delivery–all in one place. This makes it easy for people to sign up for a day or time to bring a meal and share what they’re bringing to help eliminate confusion. A few of my favorite meal-coordination sites are Take Them A Meal, Meal Train, and Care Calendar.

9. Don’t Expect To Stay And Chat
When you deliver a meal to someone in need, don’t plan on making a day of it. The recipient may or may not be up for visitors right now, but don’t assume this is your chance to get some quality one-on-one time. New parents especially have their hands full, and they may just want you to quietly leave your food and move right along (so they can, you know, scarf down the only meal they’re going to eat today before the baby wakes up). Soon enough they will be ready for visitors–in fact, they’ll probably be begging for someone to come pass the time with them in a few months–but right now your mission is to bring food and leave them in peace.

10. Consider Other Meals
If you are bringing someone dinner, consider bringing along a little something extra for breakfast the next day. These meals that friends are bringing may be the only real meals this person is eating–and Mom always said that breakfast was the most important meal of the day.

With a little preparation and a few thoughtful touches, you can brighten someone’s day when they need it the most–and fill their tummies while you’re at it! Now, go forth and pay it forward.


How a Mom Actually Cooks Dinner

IMG_4985

Last night I decided to try a new recipe for dinner.  When it comes to dinner–especially week-night dinners–I usually try to stick with the basics. Things that I’ve made a thousand times and could cook in my sleep (or in the zombie-like trance that is otherwise known as “motherhood”). I had found a new recipe that I really wanted to try, though, and I was feeling brave so I decided to give it a go.

The recipe in question this night was Sausage and Roasted Vegetable Penne. The recipe basically went like this:

Prep time: 15 minutes
Level of difficulty: Easy

Directions:
Step 1: Chop and roast vegetables
Step 2: Boil water and cook pasta
Step 3: Cook sausage
Step 4: Mix it all together and serve

It all seemed simple enough. 15 minutes. Four easy steps. I can do this. Even at the end of a long day with two tired children…how hard could it be? Famous last words…

Here is how a mom actually cooks dinner:

Prep time: 1 1/2 hours, give or take
Level of difficulty: Grueling

Directions:
Step 1: Wash your hands.
Step 2: Start chopping onions but stop halfway through to go change a diaper.
Step 3: Wash your hands.
Step 4: Start chopping bell peppers but stop halfway through to give the kids a snack.
Step 5: Start chopping zucchini but stop halfway through to deal with your distraught 3-year old who has discovered that some monster (you) threw away one of his broken McDonald’s toys.

IMG_4965

Step 6: Toss vegetables with olive oil and a bit of salt and pepper. Place on a baking tray.
Step 7: Try to put the baking tray in your oven and realize that it’s too big and won’t fit. Transfer everything to a smaller tray. Total time elapsed thus far: 38 minutes.

Step 8: While the vegetables are roasting in the oven, put some water in a pot for the pasta. While the pot is filling, you get a phone call. You (stupidly) answer the phone and it’s a telemarketer who won’t hang up. Run back to the sink and dump half of the water out of your overflowing pot.
Step 9: Put the pot on to boil. Meanwhile, begin to cook sausage in a pan.
Step 10: Trip over the dog 5,000 times.
Step 11: Toss the vegetables and return them to the oven.
Step 12: Drag your toddler around the kitchen while he sits on your foot.

IMG_4975 Step 13: Deglaze the sausage with a splash of white wine. Decide that’s a good idea and pour yourself a glass.

IMG_4982 Step 14: Add pasta to the boiling water and cook to al dente.
Step 15: Discover that your children have moved all of their muddy balls from the backyard into your kitchen. Spend the next few minutes throwing muddy balls out the back door.

IMG_4984 Step 16: Wash your hands.
Step 17: Remove vegetables from the oven.
Step 18: Read a story to your distraught toddler who, judging by his wails, thinks you have abandoned him for all eternity.

IMG_4971 Step 19: Drain pasta, reserving some of the liquid for your sauce.
Step 20: Answer your 3-year old’s shouts that he’s “all done and needs a wipe” in the upstairs bathroom.
Step 21: Wash your hands.
Step 22: Eat some cheese.
Step 23: Combine pasta, sausage, and roasted veggies in a large pot. Sprinkle with Parmesan cheese and serve.
Step 24: Collapse exhausted in your seat at the dinner table and hope that somebody will actually eat the meal set before them instead of the usual “that’s gross” or throwing food across the room to the dog.
Step 24: Give yourself a pat on the back and a gold star. Dinner: accomplished.

Hooray! You did it! Now, go clean those dishes and get ready because you get to do it all over again tomorrow night. Actually, scratch that. Just look up the phone number for pizza delivery and save yourself the trouble. How hard could that be?

Authentic Irish Scone Recipe

We’ve lived in Ireland for the better part of a year now, and in these past few months I have come to some conclusions about Irish culture:

1.  “Type-B” personalities run the roost.

2. You must, MUST, support your local hurling/rugby/football team with the undying love of a mother for her only child.

3. Tea and scones are synonymous with life itself.

It is this final conclusion that has brought me to the point I am at now–that is, the point at which I have become obsessed with tea and scones (trust me, my waistline bears the proof). Of course, it didn’t take much convincing to get me to eat fresh-baked bread smothered in cream and jam. And I doubt it will for you, either. So the next time you want a homemade treat or a tasty tea or a light breakfast, just whip up a batch of Irish scones. I have to warn you, though–you just might get hooked!

photo 1 (2)

Irish Scones
Makes 4-6 delectable treats

Ingredients:

2 cups/225 g self raising flour
1 tsp baking powder
1/2 tsp salt
4 Tablespoons/55 g butter
2 tsp/1 oz fine sugar (optional)
1 cup/150 ml milk
1 handful raisins (optional)
1 egg beaten with a splash of milk

Preparation:

  • Preheat the oven to 400F/205C/Gas 8
  • Grease and flour a baking sheet
  • In a large bowl, whisk together the flour, baking powder and salt. Add the butter and use a pastry cutter or two forks to cut it into the flour mixture until it resembles fine breadcrumbs. Add the sugar (if using) and stir.
  • Make a well in the center of the flour and slowly stir in enough milk to make a soft, pliable dough.
  • Add the raisins (if using) and mix them into the dough.
  • Turn the dough onto a well-floured board and knead very lightly until just smooth, then roll out to about 3/4″ (2 cm) thick.
  • Cut rounds with a 3″ cutter or an overturned glass, or cut into triangles using a sharp knife.
  • Place scones on the prepared baking tray and brush with the beaten egg and milk mixture.
  • Bake near the top of the hot oven for 15 minutes, until golden brown.
  • Cool on a wire rack
  • Serve with butter and lashings of jam and cream. Drink a cup of tea. Feel very Irish.

photo 2

Repost: Easter “Resurrection Roll” Bible Story and Recipe

Easter is just a few weeks away, which means it’s time to bring back all of my favorite lent activities. Easter is such a special time to share with children, and I’m always looking for fun and creative ways to share the truth of this season with my boys. This week we will begin using our resurrection eggs and we’ll also be doing one of my all-time favorite cooking projects: resurrection rolls. Resurrection rolls are a simple (and, might I add, delicious) way to share the gospel with children, a truly memorable experience. I thought I’d repost the recipe and story here for you if you’d like to join in the fun–enjoy!

Original Post: Resurrection Roll Recipe and Bible Story

I love finding creative ways to teach important truths to kids. And I love it even more if I can find a way to tie food into the “lesson”. You can imagine my excitement, then, when I first discovered Resurrection Rolls.

Basically, Resurrection Rolls are a treat that you make where each step of the cooking process represents part of the Easter story. It’s a wonderful way to tell kids the Easter story AND the rolls themselves are sublime. I’ve had people make the rolls for me before, but this was my first time doing the whole project with David. He was able to help out a bit and was pretty engaged the whole time (even if he did keep trying to swipe marshmallows from my stash). I’ll definitely be doing this again next year–a new tradition has been born!

What you’ll need:

IMG_1498

  • 1 package of crescent rolls
  • 8 large marshmallows (plus extras to snack on while you’re waiting for the rolls to bake!)
  • 3 Tablespoons melted butter
  • 3 Tablespoons sugar plus 1 Tablespoon cinnamon
  • Parchment paper
  • Baking sheet
  • Bible (or use the “script” below)

How It’s Done:

IMG_1513Start by preheating your oven to 350 degrees. While the oven is preheating, get out your Bible and open up to John 19 or find the Easter story in a children’s Bible (my favorite is the Jesus Storybook Bible). Below you’ll find the pictures and the “script” for how I told the story to David (he’s only 2 years old, so I kept it simple for him).

IMG_1509

Say: “Even though Jesus was perfect and had never sinned–he had never ever done anything wrong– some people did not like him. They wanted to hurt Jesus because he said he was God. They made Jesus carry a cross and they killed him. This made God very sad, but it was all part of His great rescue plan. When Jesus died, his friends took his body off the cross.”

IMG_1510

Do: Give your child a marshmallow
Say: “This marshmallow represents Jesus’ body. Jesus died for you and for me, because we have sinned and we need to be rescued from our sin.”

IMG_1512

Say: “After Jesus died, his friends came and they put special oil and spices on Jesus’ body to get him ready for burial.”
Do: Roll the marshmallow in melted butter, then in cinnamon sugar

Say: “Next, Jesus’ friends wrapped his body in special cloths–almost like a mummy! Jesus had died, and they were getting his body ready to bury.”
Do: Roll the cinnamon-sugar marshmallow up in a crescent roll (it won’t look like a crescent roll). Press all of the seams firmly. Repeat for each of the crescent rolls. Place the rolls on a parchment paper-lined baking sheet.

IMG_1511

Say: “Next, they laid Jesus’ body in a tomb. A tomb is like a big cave carved out of rock. Then big, strong soldiers rolled a heavy rock in front of the tomb so nobody could get in or out of the tomb. They even put a special seal over the entrance so they would know if anybody tried to move the rock that was in front of the entrance. Soldiers stood in front of the tomb to guard it day and night.”
Do: Put the rolls in the oven and set your timer for 10-12 minutes. Let the rolls bake until they are golden-brown. I even let David stand guard in front of our oven “tomb” with his toy sword.

IMG_1506

Say: “Jesus was dead in the tomb for three days. Let’s count to three: one, two, three. How many days was he in the tomb? That’s right, three days.”
(We had some time to wait for the rolls, so I let David play while they were baking. I kept going back to him, though, and we’d repeat this whole conversation about how long Jesus was in the tomb.)

IMG_1514

Do: When the rolls are done baking, take them out of the oven and let them cool (I let mine cool for about 20 minutes, and that was perfect). The marshmallow will probably have exploded out of your rolls, but that’s to be expected (that’s why we put down the parchment paper!). After the rolls have cooled…

IMG_1516

Say: “Three days after Jesus had died, an angel of God appeared to one of Jesus’ friends. He told her that Jesus was alive! Jesus’ friends decided to look in the tomb where they had put Jesus’ body, but when they did, it was empty! Jesus had risen! And still today, Jesus is alive. Today he lives in heaven with God.”
Do: Cut open one of the rolls. The marshmallow has melted, so the “tomb” is now empty.

IMG_1522

Do: Eat your yummy rolls!
Say: “These rolls are sweet, just like the love of God. God made you and he loves you very much. And some day, if you choose to love and follow God, you will be able to spend forever and ever in heaven with him and Jesus. The Bible tells us that Jesus is our Great Rescuer. The Bible tells us that the only way to Heaven is through loving and believing in Jesus. We celebrate Easter, because Jesus died and rose again so that we could have a way to Heaven.”

Cinnamon Cookie Butter Muffins

IMG_1324

When we went back to the states for Christmas I noticed several changes that had already taken place since we’d move: new housing developments had sprung up all over the place, all of our friends had new babies, and the Seahawks were on their way to the Superbowl (!). Lots of big changes. No change struck me as much, however, as the introduction of this new product into the American marketplace: cookie butter. What the what?! Cookie BUTTER? I mean, come ON.

IMG_1326

I just had to try it. Thankfully, my ever-observant sister-in-law read the desires of my heart and I was the happy recipient of my own (rather large) jar of cookie butter on Christmas morning. The stuff is good. Really good. It tastes a bit like creamy shortbread or graham cracker pie crust. The only problem is, what am I supposed to do with nearly two pounds of cookie butter?

I’ve tried the cookie butter spread on toast (yummy) and as a dip for fruit (delicious), but I was ready to step out of my cookie-butter-comfort-zone and try something new. I found this recipe for cinnamon cookie butter muffins and, after a few tweaks, I was on the road to cookie butter perfection. It’s not exactly health food in a muffin tin but, man, are they tasty:

Cinnamon Cookie Butter Muffins
Makes 1 dozen mouth-watering muffins

Ingredients:

1 ½ cups flour
½ Tablespoon baking powder
¼ teaspoon salt
½ teaspoon cinnamon
5 Tablespoons unsalted butter, softened
½ cup sugar
1 large egg
½ teaspoon vanilla
¼ cup cream cheese
¼ cup milk
8 Tablespoons cookie butter (find cookie butter at Trader Joe’s, Costco, or on Amazon)
Cinnamon sugar (combine 2 Tablespoons sugar and 1/2 teaspoon cinnamon)

Directions:

1. Preheat oven to 375 degrees F (190 degrees C for all of my Irish friends who may be reading this!).
2. Line a muffin tin with muffin papers.
3. In a medium bowl, whisk together the flour, baking powder, salt, and cinnamon.
4. In a large bowl using a hand mixer, beat butter and sugar together until light and fluffy. Add the egg and vanilla and beat until well combined. Add the cream cheese, milk, and 2 Tablespoons of cookie butter and beat until combined.
5. Add the flour mixture to the wet ingredients and mix until just combined.
6. Spoon muffin batter into muffin liners until about 1/2 full. Spoon about 1/2 Tablespoon of cookie butter onto each muffin, then top with another small spoonful of muffin batter.

IMG_1310

7. Top each muffin with a sprinkling of cinnamon sugar.
8. Bake muffins for 10-12 minutes, until the muffins start to turn golden brown.
9. When you go to pull your muffins out of the oven, DO NOT TOUCH THE SIDE OF THE OVEN thus burning your hand and spilling the muffins in the process. This may have happened to a friend. Her muffins looked like this:
IMG_1313 (Don’t worry, I was able to salvage all but one muffin from this little incident)

10. Let the muffins cool completely before you eat them (remember, there’s a molten core of cookie butter in the middle). Enjoy!

IMG_1319

The final verdict? Cinnamon cookie butter muffins are every bit as delectable as you imagine they would be. So go bake yourself a batch. Now!

IMG_1316

Mom’s “Famous” Zucchini Soup Recipe

photo

My mom has an incredible garden that we fondly refer to as “Nana’s Secret Garden”. I don’t have a garden myself (nor should I with my two “brown thumbs”), but my boys love playing in her garden and eating fruit, berries and veggies (literally) off the vine. This time of year Nana’s Secret Garden is bursting with zucchini, some the size of my small children. It was from this prolific garden that my mom was inspired to create this recipe for zucchini soup. This soup is one of my favorite end-of-summer treats–it is creamy with a fresh, vibrant taste. In fact, this soup is so good that it was published in Sunset Magazine–which, basically, makes this soup famous. At least to me. And it really does deserve to be famous.

Well, I was at the grocery store yesterday trying to figure out what I’m going to feed my family this week (somehow it’s still a mystery to me. Every. Single. Week. You’d think that after years of cooking every single day I’d know what to make for dinner but, alas, I still wander the grocery store looking for inspiration, week after week). This week, my store had courgettes on sale–only I didn’t know what courgettes were. I have learned that there are many different names for things here in Ireland. As it turns out, courgettes are none other than the humble zucchini. And you know what that means? I get my zucchini soup, even though I’m thousands of miles away from Nana’s Secret Garden.

So here is my mom’s award winning recipe for zucchini soup. I hope you enjoy it as much as I do!

zucchini-soup-su-637683-lCurried Zucchini Soup

1 large zucchini (or courgette!)
1 large onion
1 head of garlic, peeled and separated into cloves
1 quart of chicken or vegetable stock
1 can coconut milk
1 can evaporated milk
1 Tablespoon curry powder
salt and pepper to taste
*instant mashed potatoes for thickening

In a large stock pot, sautee coarsely chopped vegetables and 1 cup of stock until the vegetables are soft. Working in small batches, puree the mixture in a blender, adding more stock to liquefy as necessary. Return vegetable puree to pot and add curry powder, salt and pepper. Simmer the mixture and add coconut milk and evaporated milk. Add more stock if necessary or, to thicken, add instant mashed potatoes.

*Since the zucchini come in many different sizes, you’ll probably need to adjust the amounts of stock and seasoning you use. Sometimes I also like to add some fresh herbs like basil at the very end of the cooking. This soup also freezes well for a taste of summer in later months.

…And, if you have LOTS of zucchini to use up, here are a few of my other favorite zucchini recipes:

Zucchini Fritters
Zucchini and Corn Tacos
Zucchini Bread
Roasted Zucchini and Tomato Pasta
Zucchini “Noodles”
Zucchini and Rosemary Frittata  

Chicken Broccoli Strudel Recipe

Last week we had a great time exploring our local farmer’s market. I bought lots of yummy food at the farmer’s market, including a fresh rotisserie chicken from this guy:

IMG_3339

One of my favorite things about rotisserie chicken is that you can usually get multiple meals out of one chicken. For dinner after our market trip we ate the chicken straight-up with some roasted veggies and bread (also all from the farmer’s market…look how “fresh and local” I’m getting!).

After dinner there was still a good amount of meat leftover, so I knew we’d have another delicious chicken dinner coming soon. Sometimes I use the leftover rotisserie chicken to make soup or pasta dishes, but this week I decided to make one of my all-time favorite recipes. I got this recipe from my friend Elizabeth (who just happens to be a food genius) and it is ammmmmmazing! It has a few simple ingredients and takes very little effort to put together, yet it tastes like it came from a fine-dining restaurant. I’ve made this dish for guests, and they’re always asking for more. So, with no further ado, the recipe:

Chicken and Broccoli Strudel

Ingredients:

a little butter or olive oil for the tray
1 Tablespoon butter or olive oil
1 C minced onion
1 large bunch broccoli finely chopped
1/2 teaspoon salt
1/2 teaspoon pepper
2 medium cloves garlic
2 cups bread crumbs
2 cups grated cheese (I usually go for cheddar)
2 Tablespoons lemon juice
2 rotisserie chicken or cooked chicken breasts, chopped as small as possible
1 heaping Tablespoon herbs de Provence
1 sheet of refrigerated puff pastry (or 1 frozen and thawed sheet of puff pastry)
1 egg, beaten
DIRECTIONS:
1) Preheat oven to 375 degrees and oil baking tray
2) Heat olive oil or butter in skillet and sautee onions 5 minutes
3) Add broccoli, salt, pepper and garlic and cook 10 more minutes, remove from heat
4) Stir in bread crumbs, cheese, lemon juice, herbs and chicken
5) To Assemble: Roll out the puff pastry onto a clean, dry board. Use a sharp knife to cut the puff pastry into four even sections. Put 1/4 of the filling onto half a section of puff pastry, leaving about a 1/4 inch border around the bottom and sides of the puff pastry. Fold the puff pastry in half over the filling and pinch tightly to seal shut (like you’re making a hot pocket…a classy hot pocket…). Repeat with each section of puff pastry until you have four strudels. Place the strudels into the greased baking tray.
6) Brush the tops and sides of each strudel with the beaten egg.
7) Bake 20-25 minutes, until golden and crisp.
WDTD_Hana_Watson_041
And, as always, ENJOY!

Fun and Learning at the Farmer’s Market

IMG_3329

Today we went on a culinary adventure to our local farmer’s market. I’ve been wanting to visit this market ever since we moved here, and I’m so glad we finally made it! It’s a great farmer’s market with all locally-sourced food–and GOOD food, at that.

Farmer’s markets are really my dream come true: I love fresh produce, bread, cheeses and the like, but I have a hard enough time getting the kids fed and my teeth brushed each day to worry about things like gardening and baking (or cheese making, mind you. Although I can see cows from my kitchen window. Perhaps that’s in my future. We’ll see.). Thankfully there are plenty of people who enjoy doing those things and they gather together every week in the parking lot at my local shopping center so I can reap the benefits.

We had a lot of fun exploring the tents and tables of the farmer’s market…and sampling our way through the stalls. We all enjoyed this cheese (and by enjoyed, I mean the boys ate about 10 slices each) so I felt obligated to buy a round:

IMG_3335

It was getting close to lunch time and all of the food looked so yummy that I couldn’t resist getting a little something. We got some delicious pizza and raspberries–which David quickly smeared over his face like a clown with a bad face-paint job:

IMG_3342

And, since I’m always one to take the easy road for dinner-prep, too, I picked up some roasted chicken and veggies for tonight’s dinner:

IMG_3339

I would have been happy just camping out at a table in the center of the market and eating all day but, alas, my children had other agendas. Turns out 2-year old boys want to touch and smell and taste (read: lick) everything in sight. And babies who were forced to skip their nap so Mom could go to the farmer’s market get cranky.

Before we left, though, we made one last pass through the stalls to play a few quick “farmer’s market games”. The teacher in me couldn’t resist sneaking in a few teachable moments disguised as food-fun. For instance:

  • IMG_3341We compared the size, shape and colors of vegetables at one stand: What is the biggest veggie you can find? What is the longest veggie you can find? Can you find a red vegetable? Can you find a vegetable that is round like a ball?
  • We found vegetables that represented the different parts of a plant: Parsnips for the roots, celery for the stem, and broccoli for the flower.
  • We played farmer’s market bingo (print your own Bingo card here)
  • We played “5 senses”: we looked at, felt, smelled, tasted, and listened to the sounds different veggies made.
  • Together we came up with three questions to ask a farmer, and then we found an obliging farmer to “interview”IMG_3336
  • We counted: Can you put three apples in our bag? Which plate has more cookies on it? How many slices of pizza did Mommy just eat for lunch?
  • We voted for our favorites: after tasting three different cheeses we talked about which was our favorite and why
  • We learned about economics: Money is used to buy the things we want and need. See, Mommy stated with a wallet full of money and now it is empty. Now Mommy needs a second job to support her new-found market obsession.

With full tummies and a (truly) empty wallet, we left the market. Until next week, farmer friends!