Frozen Frog Pond Activity

IMG_6344

Last week we had our first real week of summer. We had sunshine every day, which was both amazing and confusing to us. What do we do outside when it’s actually warm out?  I think it reached 70 degrees one day and, having grown up in a rain cloud, my poor children thought they were dying from the heat. So, I came up with a simple game that would help keep us cool. I call it:

Frozen Frog Pond

What you need:
small containers (I used snack size Ziploc food containers)
plastic frogs (I got mine at the dollar store)
kiddie pool or a large plastic tub (although the bath tub would work just fine, too)

What you do:
1. Put a few frogs into each container and fill with water until the frogs are just covered. Freeze for 2 hours or until the frog-cubes are frozen solid.

IMG_6329

2. Pop the frozen frog-cubes out of the containers

IMG_6330

3. Put the frog-cubes into the pool. Challenge your kids to see who can set the frogs free from their icy prisons. Whoever gets the most frogs out of the ice wins!

IMG_6346

That’s it! The boys had a lot of fun trying to get their frogs out of the ice and they certainly got cooled off in the process (Jacob kept muttering, “So cold…” as he fumbled with his ice cubes). Here are a few other ideas to extend the froggy play time:

IMG_6352

– Gather sticks, leaves, and rocks and make homes for your froggy friends in their pond (this one probably wouldn’t work so well if you’re using your bath tub…)
-See how many pairs of the same frog you can find
-Order the frogs from smallest to largest
-Sort the frogs into color groups
-Have a leapfrog race
-Count the frogs or work out simple story problems using the frogs (“If I have 3 frogs in the pond and one jumps out, how many are still left in the water?”)
-Have a color race: Hold up a solid-colored frog, set a timer for 30 seconds, and see how many items your child can find that are the same color.

Stay cool, friends!

Repost: Easter “Resurrection Roll” Bible Story and Recipe

Easter is just a few weeks away, which means it’s time to bring back all of my favorite lent activities. Easter is such a special time to share with children, and I’m always looking for fun and creative ways to share the truth of this season with my boys. This week we will begin using our resurrection eggs and we’ll also be doing one of my all-time favorite cooking projects: resurrection rolls. Resurrection rolls are a simple (and, might I add, delicious) way to share the gospel with children, a truly memorable experience. I thought I’d repost the recipe and story here for you if you’d like to join in the fun–enjoy!

Original Post: Resurrection Roll Recipe and Bible Story

I love finding creative ways to teach important truths to kids. And I love it even more if I can find a way to tie food into the “lesson”. You can imagine my excitement, then, when I first discovered Resurrection Rolls.

Basically, Resurrection Rolls are a treat that you make where each step of the cooking process represents part of the Easter story. It’s a wonderful way to tell kids the Easter story AND the rolls themselves are sublime. I’ve had people make the rolls for me before, but this was my first time doing the whole project with David. He was able to help out a bit and was pretty engaged the whole time (even if he did keep trying to swipe marshmallows from my stash). I’ll definitely be doing this again next year–a new tradition has been born!

What you’ll need:

IMG_1498

  • 1 package of crescent rolls
  • 8 large marshmallows (plus extras to snack on while you’re waiting for the rolls to bake!)
  • 3 Tablespoons melted butter
  • 3 Tablespoons sugar plus 1 Tablespoon cinnamon
  • Parchment paper
  • Baking sheet
  • Bible (or use the “script” below)

How It’s Done:

IMG_1513Start by preheating your oven to 350 degrees. While the oven is preheating, get out your Bible and open up to John 19 or find the Easter story in a children’s Bible (my favorite is the Jesus Storybook Bible). Below you’ll find the pictures and the “script” for how I told the story to David (he’s only 2 years old, so I kept it simple for him).

IMG_1509

Say: “Even though Jesus was perfect and had never sinned–he had never ever done anything wrong– some people did not like him. They wanted to hurt Jesus because he said he was God. They made Jesus carry a cross and they killed him. This made God very sad, but it was all part of His great rescue plan. When Jesus died, his friends took his body off the cross.”

IMG_1510

Do: Give your child a marshmallow
Say: “This marshmallow represents Jesus’ body. Jesus died for you and for me, because we have sinned and we need to be rescued from our sin.”

IMG_1512

Say: “After Jesus died, his friends came and they put special oil and spices on Jesus’ body to get him ready for burial.”
Do: Roll the marshmallow in melted butter, then in cinnamon sugar

Say: “Next, Jesus’ friends wrapped his body in special cloths–almost like a mummy! Jesus had died, and they were getting his body ready to bury.”
Do: Roll the cinnamon-sugar marshmallow up in a crescent roll (it won’t look like a crescent roll). Press all of the seams firmly. Repeat for each of the crescent rolls. Place the rolls on a parchment paper-lined baking sheet.

IMG_1511

Say: “Next, they laid Jesus’ body in a tomb. A tomb is like a big cave carved out of rock. Then big, strong soldiers rolled a heavy rock in front of the tomb so nobody could get in or out of the tomb. They even put a special seal over the entrance so they would know if anybody tried to move the rock that was in front of the entrance. Soldiers stood in front of the tomb to guard it day and night.”
Do: Put the rolls in the oven and set your timer for 10-12 minutes. Let the rolls bake until they are golden-brown. I even let David stand guard in front of our oven “tomb” with his toy sword.

IMG_1506

Say: “Jesus was dead in the tomb for three days. Let’s count to three: one, two, three. How many days was he in the tomb? That’s right, three days.”
(We had some time to wait for the rolls, so I let David play while they were baking. I kept going back to him, though, and we’d repeat this whole conversation about how long Jesus was in the tomb.)

IMG_1514

Do: When the rolls are done baking, take them out of the oven and let them cool (I let mine cool for about 20 minutes, and that was perfect). The marshmallow will probably have exploded out of your rolls, but that’s to be expected (that’s why we put down the parchment paper!). After the rolls have cooled…

IMG_1516

Say: “Three days after Jesus had died, an angel of God appeared to one of Jesus’ friends. He told her that Jesus was alive! Jesus’ friends decided to look in the tomb where they had put Jesus’ body, but when they did, it was empty! Jesus had risen! And still today, Jesus is alive. Today he lives in heaven with God.”
Do: Cut open one of the rolls. The marshmallow has melted, so the “tomb” is now empty.

IMG_1522

Do: Eat your yummy rolls!
Say: “These rolls are sweet, just like the love of God. God made you and he loves you very much. And some day, if you choose to love and follow God, you will be able to spend forever and ever in heaven with him and Jesus. The Bible tells us that Jesus is our Great Rescuer. The Bible tells us that the only way to Heaven is through loving and believing in Jesus. We celebrate Easter, because Jesus died and rose again so that we could have a way to Heaven.”

Fun and Learning at the Farmer’s Market

IMG_3329

Today we went on a culinary adventure to our local farmer’s market. I’ve been wanting to visit this market ever since we moved here, and I’m so glad we finally made it! It’s a great farmer’s market with all locally-sourced food–and GOOD food, at that.

Farmer’s markets are really my dream come true: I love fresh produce, bread, cheeses and the like, but I have a hard enough time getting the kids fed and my teeth brushed each day to worry about things like gardening and baking (or cheese making, mind you. Although I can see cows from my kitchen window. Perhaps that’s in my future. We’ll see.). Thankfully there are plenty of people who enjoy doing those things and they gather together every week in the parking lot at my local shopping center so I can reap the benefits.

We had a lot of fun exploring the tents and tables of the farmer’s market…and sampling our way through the stalls. We all enjoyed this cheese (and by enjoyed, I mean the boys ate about 10 slices each) so I felt obligated to buy a round:

IMG_3335

It was getting close to lunch time and all of the food looked so yummy that I couldn’t resist getting a little something. We got some delicious pizza and raspberries–which David quickly smeared over his face like a clown with a bad face-paint job:

IMG_3342

And, since I’m always one to take the easy road for dinner-prep, too, I picked up some roasted chicken and veggies for tonight’s dinner:

IMG_3339

I would have been happy just camping out at a table in the center of the market and eating all day but, alas, my children had other agendas. Turns out 2-year old boys want to touch and smell and taste (read: lick) everything in sight. And babies who were forced to skip their nap so Mom could go to the farmer’s market get cranky.

Before we left, though, we made one last pass through the stalls to play a few quick “farmer’s market games”. The teacher in me couldn’t resist sneaking in a few teachable moments disguised as food-fun. For instance:

  • IMG_3341We compared the size, shape and colors of vegetables at one stand: What is the biggest veggie you can find? What is the longest veggie you can find? Can you find a red vegetable? Can you find a vegetable that is round like a ball?
  • We found vegetables that represented the different parts of a plant: Parsnips for the roots, celery for the stem, and broccoli for the flower.
  • We played farmer’s market bingo (print your own Bingo card here)
  • We played “5 senses”: we looked at, felt, smelled, tasted, and listened to the sounds different veggies made.
  • Together we came up with three questions to ask a farmer, and then we found an obliging farmer to “interview”IMG_3336
  • We counted: Can you put three apples in our bag? Which plate has more cookies on it? How many slices of pizza did Mommy just eat for lunch?
  • We voted for our favorites: after tasting three different cheeses we talked about which was our favorite and why
  • We learned about economics: Money is used to buy the things we want and need. See, Mommy stated with a wallet full of money and now it is empty. Now Mommy needs a second job to support her new-found market obsession.

With full tummies and a (truly) empty wallet, we left the market. Until next week, farmer friends!

The Ultimate “Busy Bag”

IMG_2960

When we moved to Ireland a few weeks ago I had a lot of concerns. Would I get homesick before we even left? Would we like our new home across the sea? Would I remember to pack all of the essentials? But the most important question of all: How would we survive a 10-hour flight with two boys under the age of 3?

Grandma to the rescue! My mother-in-law is incredibly gifted with all things crafty. She can take felt and a sewing machine and fabricate incredible creations (whereas I would take the aforementioned objects and make something worthy for display at a Kindergarten art show). She took her crafting skills to a whole new level when she created this: The Ultimate Busy Bag.

IMG_2933

Inside is a treasure trove of games and activities that could satisfy children not only for a 10-hour plane ride, but for weeks–nay, months–on end.

IMG_2936

She created the bag itself from fabric scraps and her own design. Many of the games were also her own creation, but she did get several ideas off Pinterest and Etsy. The bag is *literally* bursting at the seams with great ideas, so I thought I would share some of them with you here. If you wanted to recreate just one or two of these ideas instead of the whole bag (because, really, I don’t know anybody else who could make all of this in one sitting!) each would make a great small project in itself. These are great ideas to have tucked away for a rainy day (or even a long summer day when the refrain “I’m bored…” starts echoing through your home). I hope you enjoy this as much as we do!

1. Felt pieces and finger puppets.
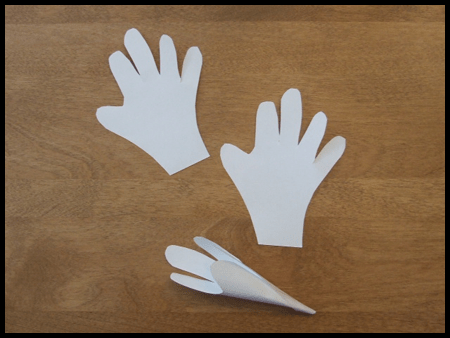
One of the sides of the busy bag is made out of felt. There are several felt pieces that can be arranged on the “felt board” for imaginary play or story telling. Most of the pieces were cut out of colored felt and then decorated (my mother-in-law’s 6-year old neighbor helped with many of these pieces).

There are sea creatures and an underwater scene:

IMG_2941

Fluffy clouds and an airplane (each of the windows and “decals” can be re-positioned on the plane):
IMG_2942

A house and garden (even our dog, Bota, makes her appearance here!):

IMG_2940

Noah and his ark full of animals (each animal is a finger puppet that can be used separately from the felt board for songs, stories, or pretend play):

IMG_2939

And, of course, the rain and the rainbow for Noah:

IMG_2938

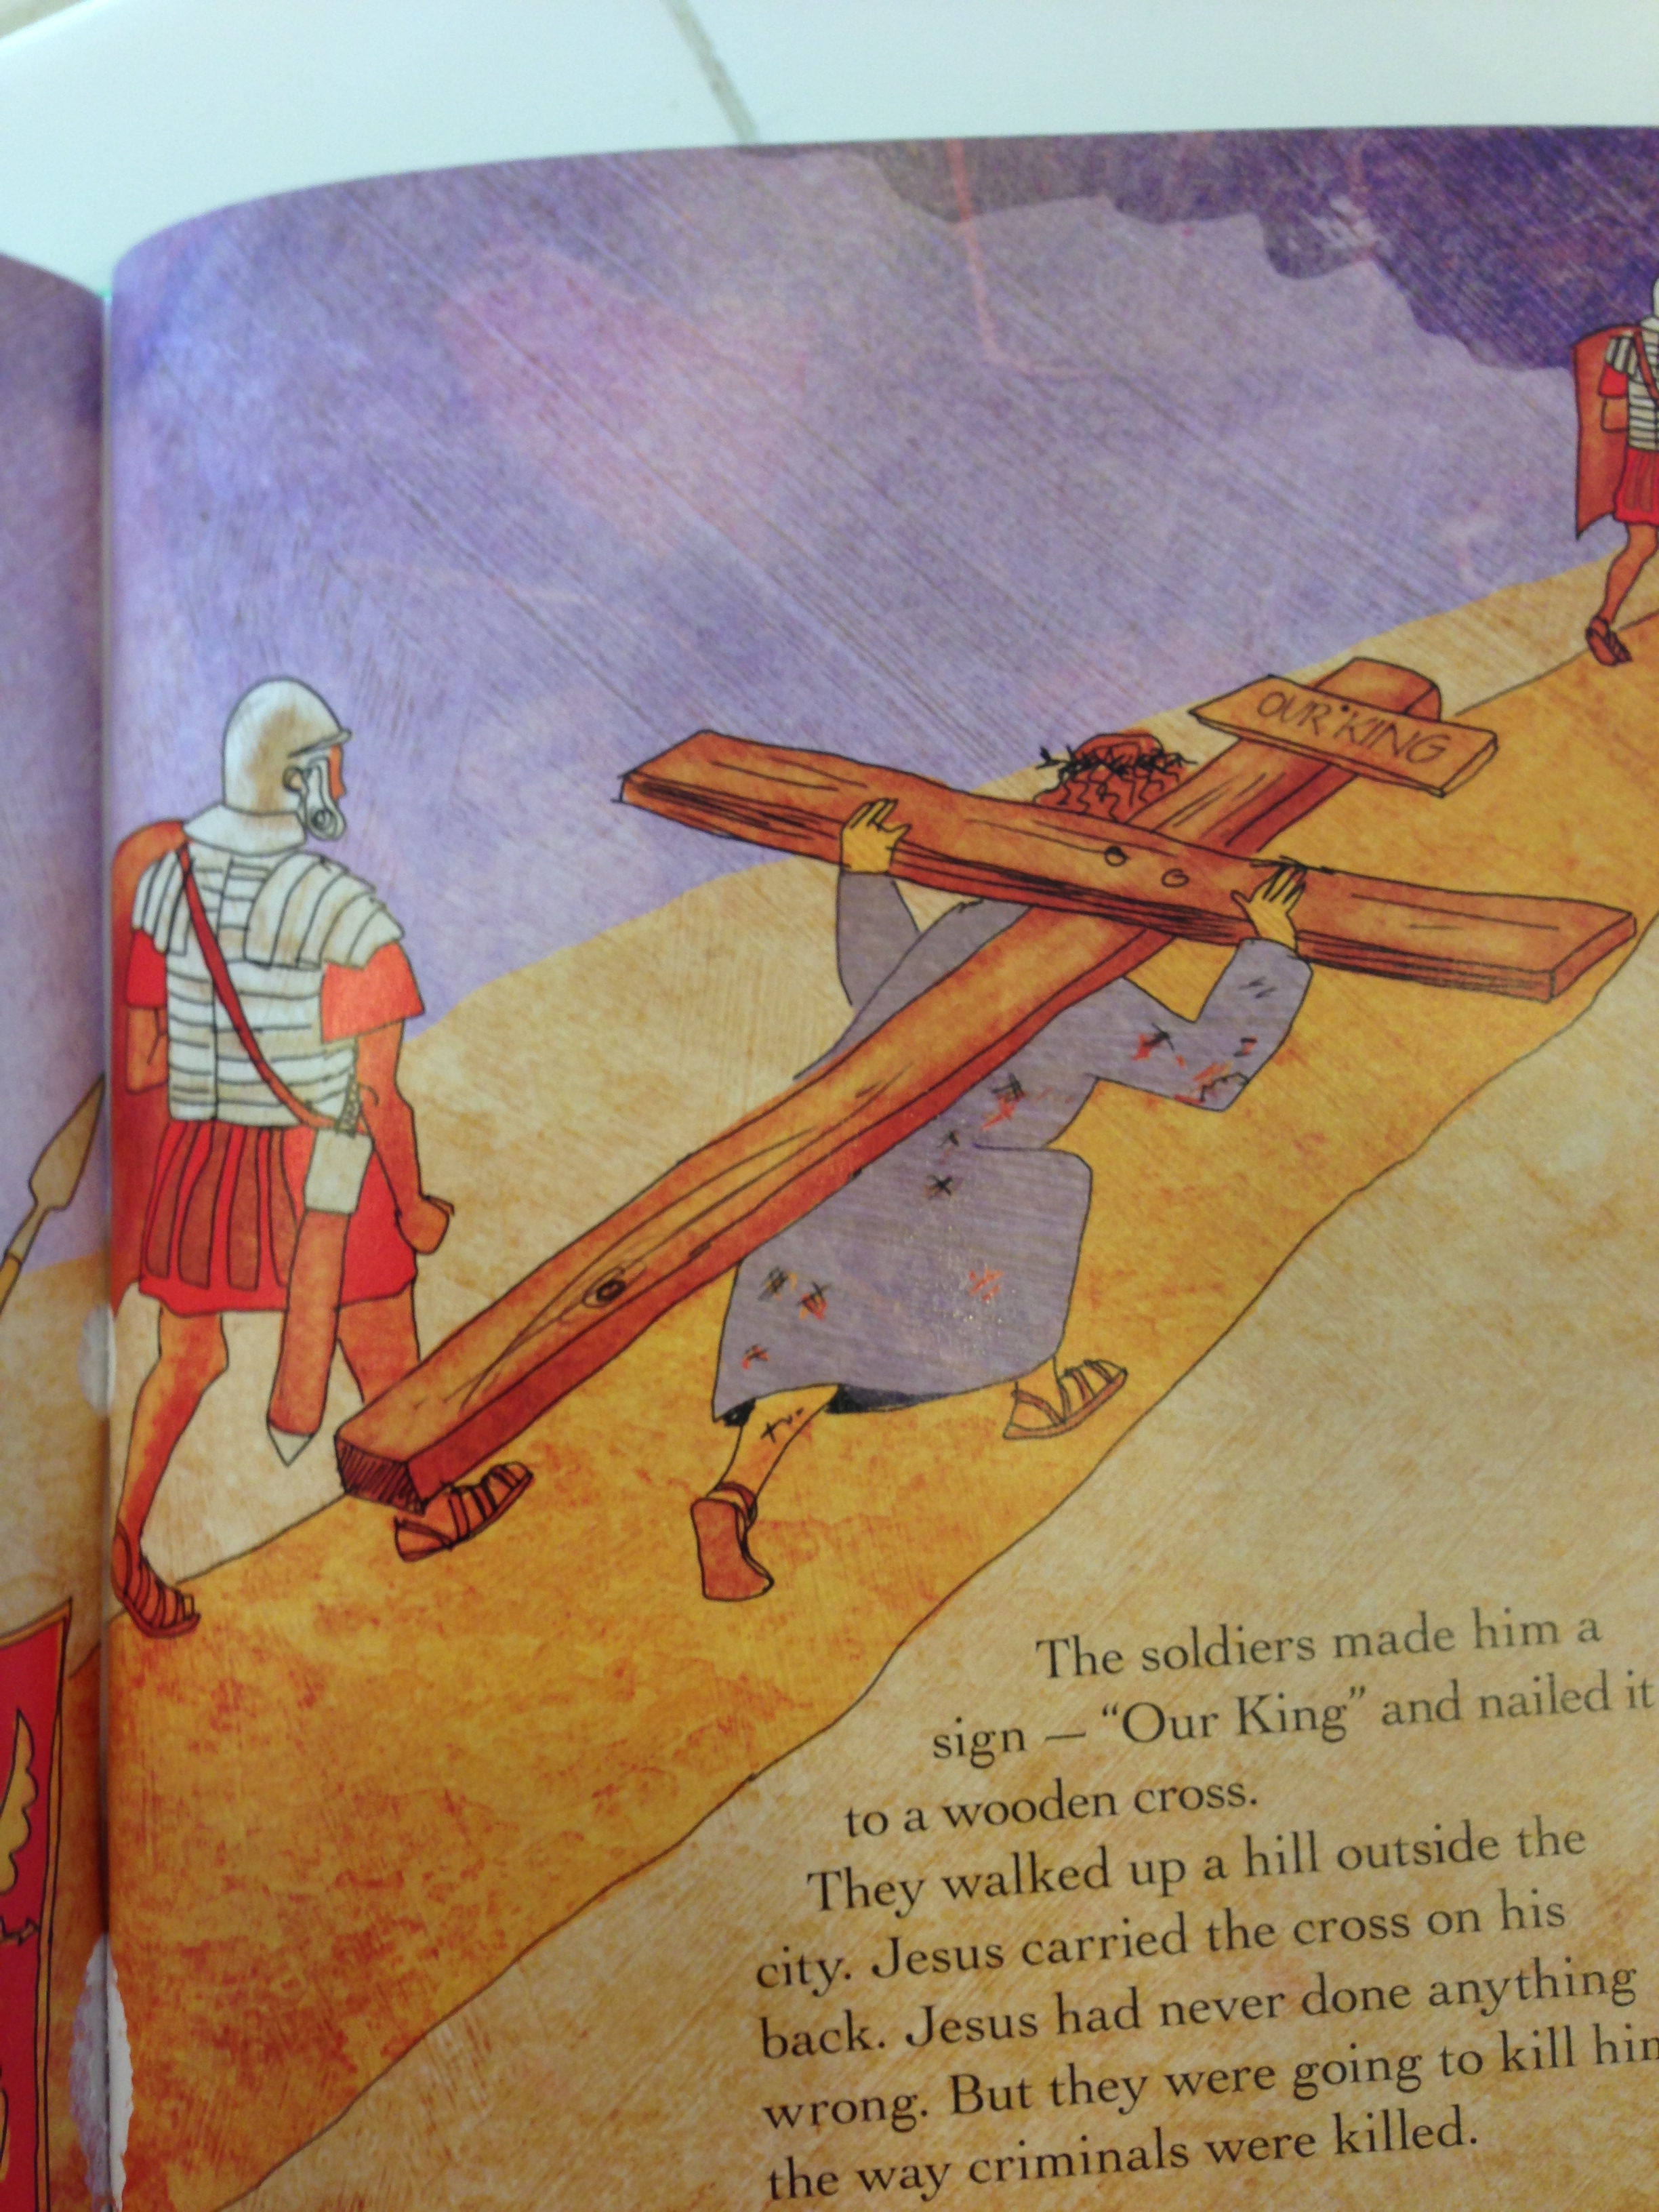
Jesus and his disciples can even sail across the Sea of Galilee in their trusty boat:

IMG_2937

2. Dry erase markers and letter practice.

IMG_2923There is a folder filled with sheets of handwriting practice, each page inside its own plastic sheet protector. Each dry erase marker has a color-coordinated pom-pom hot-glued to the cap that can be used as an on-the-spot eraser. David uses the colorful dry erase markers to trace the letters and color the pictures in his handwriting book–when he’s done, he just flips over the marker and uses the pom-pom eraser to clear the page. It is easy to find handwriting worksheets online (just do a Google search for “handwriting practice” or “handwriting printable” and look under images). You could also insert pages from coloring books, outlines of common objects, or blank pages for your child to draw on with the dry erase markers.

3. The Mitten book and finger puppets

This is one of the boys’ favorite activities in the busy bag. My MIL found this activity on Etsy, and I think it’s absolutely brilliant. The activity consists of the picture book The Mitten by Jan Brett and a large knit mitten full of finger puppet versions of the animals in the story.

IMG_2929

If you haven’t read this story, you should. Jan Brett is one of my favorite children’s authors, and this one is a classic. In the story (a Ukrainian folktale) a little boy loses his white mitten in the snow. Woodland animals find the mitten and, one by one, they burrow inside the lost mitten to keep warm. As I read the book, David helps to put each animal into the mitten as they appear in the story. It’s a great age-appropriate interactive reading activity–and he just can’t get enough of it. If you don’t have your own mitten and animal finger puppets, you can print off your own mitten craft from the author’s website and make your own!

4. Felt Numbers and Letters

There are two sets each of felt letters and numbers for David to play with and manipulate. The possibilities here are endless! We’ve been using the letters to play “find the sound” (I’ll say a sound and he has to find the letter that makes that sound) and “letter match” (we’ll find a letter in a book or on an object in the room and he has to find the same letter from his pile of felt letters).

I used the numbers to show David representations (using balls, of course, because he will learn ANYTHING 10 times faster if it can be somehow related to balls):

IMG_2944

And we even practiced putting the numbers in order from 0-10 (OK, I did this, but he helped me count the numbers after I got them all set up):

IMG_2952

5. Art and Craft Supplies

IMG_2948There are several art and craft supplies that David can use for his own creative works: markers, scissors, a sketch pad, colorful pipe cleaners, stickers. We’ve been practicing how to use markers on paper ONLY and that we only use scissors when there is a grown-up there to help us. He’s actually been doing really well with all of his “big kid” supplies–especially the fact that he can now color a picture and then cut it into a million pieces. Toddler confetti!

We also like using the pipe cleaners to make “bowls full of worms”. The boys thread the pipe cleaners through the holes in the pipe cleaners (I put them in for baby Jacob) and then pull them out. It’s good fine motor practice..and also just a lot of fun!

photo

6. Some Personal Touches

IMG_2934

There are several smaller items that are personalized to David and Jacob. There is a little American flag so they can remember where they came from (represent!) and a little bendy bear that their dad used to play with when he was little. There is also a really cute set of “ABC Bible Verses” where each letter of the alphabet has a corresponding Bible verse (print your own here). We may have to use these for some memorizaton practice soon!

Thank you for the special gift, Grammy! We will treasure it forever!

IMG_1542

My Summer Bucket List

Mukilteo Park May 2012 - 0012

Ahhhhhh…summer. It really is the most wonderful time of the year. I may be a bit biased because up until about 2 years ago I had spent my whole life in school (as either a student or a teacher) so summer has always just been the thing I looked forward to all year. Now that I have kids, though, I’m more excited for summer than ever before. Again, I may be a bit biased–as a stay-at-home mom in rainy Seattle I really can’t wait to get the kids outside and finally do something.

A few months ago I made a spring bucket list. I’m happy to report that I have checked off every item from that list…except for two: “plant something” and “fix our yard” (I knew those were bad ideas even as I was writing them. In my defense, though, I did buy a potted basil plant from Trader Joe’s and it’s still alive. I also have managed to keep the dog poop mostly picked up from our back yard, so that’s kinda like fixing the yard, too.). My favorite discovery from my spring bucket list was visiting new parks in our area. I found a lovely gem a few miles away with a wetland boardwalk and a large playground–we’ve already spent several afternoons exploring there.

Now it’s time to see what summer has to offer. This summer will be different from any other that I’ve ever experienced as we’ll be moving to Ireland in July. But what would summer be without a healthy dose of adventure mixed in? Here’s a bit of what I’m planning for this season:

  • Build sand castles at the beach
  • Climb a real castle (yay, Ireland!)
  • Pick fresh berries from a U-pick farm
  • Ride the car ferry over to Whidbey Island or the Olympic Peninsula for a day trip
  • Catch the ice cream man
  • Take in some free children’s concerts in the park
  • Throw a killer first birthday party for my little Jacob!
  • Walk down Alki Beach and pretend like I’m in California
  • Take in a firework show
  • Get a pedicure so my feet look cute in flip flops
  • Eat a picnic dinner in a park
  • Watch an outdoor movie
  • Take the free ferry over to Jetty Island for some play time at the warm water beach
  • Make our own Popsicles and eat them outside
  • Play in the kiddie pool we have hidden under our deck
  • Play with sidewalk chalk
  • See a parade (be in a parade?!)
  • Take David to a baseball game
  • Barbecue. Lots and lots of BBQ.
  • NOT get a sunburn
  • Go bowling (kids bowl free in the summer!)
  • Walk barefoot in the sand
  • Borrow my parents’ stand-up paddle boards and get out on the water
  • Read books with my kids outside under the trees
  • Go to a farm
  • Go hiking
  • Watch a beautiful sunset
  • Fly a kite
  • Swim
  • Roast marshmallows over a fire
  • Go to the fair
  • Run through the sprinkler
  • Play mini golf
  • Go on a nature walk
  • Play with water balloons
  • Blow bubbles
  • Make ice cream in a bag
  • Rest (I don’t know how I’ll have time to fit that one in with all of these other fun ideas, but it seems like it would be a good idea!)

What are some of your favorite summertime activities? I’d love some fresh ideas!

Easter Lily Handprint Craft

image295

I enjoy making gifts for the important people in my kids’ lives. Just a little something to show that we’re thinking of them and that we are grateful for all that they do for us. Easter seemed like a worthy occasion, so David and I went to work.

I used to make these Easter lilies with my first graders every Spring after we read the book The Parable of the Lily. It’s a wonderful story about how something ordinary and unexpected (like a flower bulb) can turn into something beautiful (like a lily). The story parallels the Easter story and has a great message about grace and forgiveness.

Unfortunately I couldn’t find my copy of the book this week, but I thought it would still be a fun little project for us to do together while baby brother was napping. David is still pretty young to do a project like this, so I ended up doing most of it. He helped out wherever he could, though–his favorite parts seemed to be helping to trace his hand and trying out the hole punch. Here’s how we made the lilies if you want to give it a go!

What you need:

  • white paper (I just used computer printer paper)
  • green paper (I used green copy paper, but construction paper or scrapbooking paper would work just as well)
  • small piece of yellow paper (or color a bit of paper yellow with a crayon)
  • crayon or pencil
  • scissors
  • tape
  • glue
  • hole punch

download (2)

What you do:

Trace your child’s hand onto the white paper. If you want to make more than one lily, you can fold the paper in half (or, if your child has tiny hands like mine, you can even fold it into quarters) before you trace so you can cut out multiple handprints from one piece of paper.

2-HandprintEasterLiliescraft

Use the scissors to cut out the handprint. Then, use a pencil to curl each finger down.Roll the handprint into a tube shape and secure with a piece of tape.

download (1)

Use the hole punch to cut out small circles of yellow paper. Glue the yellow dots into the inside of the white handprint flower.


Roll a tube out of a strip of green paper–this will be your flower stem (you can make it as long and as wide as you want). Secure your paper tube with a piece of tape. Cut out leaves from your green paper scraps and tape them onto the stem. Put a dollop of glue on the bottom of your flower (“runny” glue works better than a glue stick for this part) and set the flower on top of the stem. Let your flower dry completely.

If you want, you can finish off your flowers with a card.

hand_print_lily_l1

Here are a couple of ideas for the text of the card:

1.
This isn’t just a lily
as you can plainly see.

I made it with my hand,
which God made a part of me.

It comes with lots of love
especially to say,
I hope you have a very
special Easter Day!

2.
A piece of me I give to you,
I used my thumb and fingers too,
To make this lily just for you.
It doesn’t smell, it doesn’t grow,
I made it because He loves us so.
Remember that on Good Friday,
Jesus died to wash our sins away.
They buried Him and 3 days passed,
He arose on Easter Sunday at last.


Ta-da! A beautiful and simple craft that will brighten anybody’s Easter!


Resurrection Roll Recipe and Bible Story

I love finding creative ways to teach important truths to kids. And I love it even more if I can find a way to tie food into the “lesson”. You can imagine my excitement, then, when I first discovered Resurrection Rolls.

Basically, Resurrection Rolls are a treat that you make where each step of the cooking process represents part of the Easter story. It’s a wonderful way to tell kids the Easter story AND the rolls themselves are sublime. I’ve had people make the rolls for me before, but this was my first time doing the whole project with David. He was able to help out a bit and was pretty engaged the whole time (even if he did keep trying to swipe marshmallows from my stash). I’ll definitely be doing this again next year–a new tradition has been born!

What you’ll need:

IMG_1498

  • 1 package of crescent rolls
  • 8 large marshmallows (plus extras to snack on while you’re waiting for the rolls to bake!)
  • 3 Tablespoons melted butter
  • 3 Tablespoons sugar plus 1 Tablespoon cinnamon
  • Parchment paper
  • Baking sheet
  • Bible (or use the “script” below)

How It’s Done:

IMG_1513Start by preheating your oven to 350 degrees. While the oven is preheating, get out your Bible and open up to John 19 or find the Easter story in a children’s Bible (my favorite is the Jesus Storybook Bible). Below you’ll find the pictures and the “script” for how I told the story to David (he’s only 2 years old, so I kept it simple for him).

IMG_1509

Say: “Even though Jesus was perfect and had never sinned–he had never ever done anything wrong– some people did not like him. They wanted to hurt Jesus because he said he was God. They made Jesus carry a cross and they killed him. This made God very sad, but it was all part of His great rescue plan. When Jesus died, his friends took his body off the cross.”

IMG_1510

Do: Give your child a marshmallow
Say: “This marshmallow represents Jesus’ body. Jesus died for you and for me, because we have sinned and we need to be rescued from our sin.”

IMG_1512

Say: “After Jesus died, his friends came and they put special oil and spices on Jesus’ body to get him ready for burial.”
Do: Roll the marshmallow in melted butter, then in cinnamon sugar

Say: “Next, Jesus’ friends wrapped his body in special cloths–almost like a mummy! Jesus had died, and they were getting his body ready to bury.”
Do: Roll the cinnamon-sugar marshmallow up in a crescent roll (it won’t look like a crescent roll). Press all of the seams firmly. Repeat for each of the crescent rolls. Place the rolls on a parchment paper-lined baking sheet.

IMG_1511

Say: “Next, they laid Jesus’ body in a tomb. A tomb is like a big cave carved out of rock. Then big, strong soldiers rolled a heavy rock in front of the tomb so nobody could get in or out of the tomb. They even put a special seal over the entrance so they would know if anybody tried to move the rock that was in front of the entrance. Soldiers stood in front of the tomb to guard it day and night.”
Do: Put the rolls in the oven and set your timer for 10-12 minutes. Let the rolls bake until they are golden-brown. I even let David stand guard in front of our oven “tomb” with his toy sword.

IMG_1506

Say: “Jesus was dead in the tomb for three days. Let’s count to three: one, two, three. How many days was he in the tomb? That’s right, three days.”
(We had some time to wait for the rolls, so I let David play while they were baking. I kept going back to him, though, and we’d repeat this whole conversation about how long Jesus was in the tomb.)

IMG_1514

Do: When the rolls are done baking, take them out of the oven and let them cool (I let mine cool for about 20 minutes, and that was perfect). The marshmallow will probably have exploded out of your rolls, but that’s to be expected (that’s why we put down the parchment paper!). After the rolls have cooled…

IMG_1516

Say: “Three days after Jesus had died, an angel of God appeared to one of Jesus’ friends. He told her that Jesus was alive! Jesus’ friends decided to look in the tomb where they had put Jesus’ body, but when they did, it was empty! Jesus had risen! And still today, Jesus is alive. Today he lives in heaven with God.”
Do: Cut open one of the rolls. The marshmallow has melted, so the “tomb” is now empty.

IMG_1522

Do: Eat your yummy rolls!
Say: “These rolls are sweet, just like the love of God. God made you and he loves you very much. And some day, if you choose to love and follow God, you will be able to spend forever and ever in heaven with him and Jesus. The Bible tells us that Jesus is our Great Rescuer. The Bible tells us that the only way to Heaven is through loving and believing in Jesus. We celebrate Easter, because Jesus died and rose again so that we could have a way to Heaven.”

Redeeming St. Patrick’s Day and a Shamrock Craft

I’ve never really liked St. Patrick’s Day. People seem to just use it as an excuse to drink too much beer and pinch unsuspecting bystanders who made the unfortunate choice to not wear green on March 17th. This year, however, I’m seeing things a bit differently. You see, I just got back from my first trip to Ireland where I learned a lot about Irish history and who St. Patrick really was (yes, he was a real person). So this year, instead of eating green eggs in a drunken stupor, I am going to try and redeem St. Patrick’s Day for my kids.

Who Was St. Patrick?
First of all, Patrick is not really a Saint (you know, the capital “s” type canonized by the Catholic church). And he’s not even Irish. Patrick was born in Scotland and, when he was about 16 years old, he was captured in a raid and brought to Ireland as a slave (this was in about the year 405–a really long time ago). At the time, Ireland was a radically pagan place– considered to be about as far away from God as any place on the planet. Patrick’s grandfather, however, had been a priest. While Patrick remained in bondage in Ireland he clung to his faith and relied on prayer. Then, after 6 years, he managed to escape and return home.

When Patrick was in his 40’s, God brought him back to Ireland–this time as a missionary (I love God’s sense of irony!). Patrick had become intimately connected with the Irish people during his years in slavery and history tells us that one of his first converts was the very man who had held Patrick in captivity. Patrick went on to spend the next several years of his life preaching and spreading the gospel throughout Ireland. He was so successful in his missionary work that he turned the once-pagan island into one of the early centers of the Christian faith.

Legend has it that on one of Patrick’s missionary journeys through Ireland he came to a castle at the top of a rocky crag called the Rock of Cashel. I had the great honor of visiting the Rock of Cashel a few weeks ago when I was in Ireland:

Ireland Allisons iPhone - 0132

It was here at the Rock of Cashel that Patrick (reputedly) used a shamrock to tell the story of the trinity and then baptized King Aengus. Basically, the illustration of the shamrock trinity is that each of the leaves represents one of God’s persons: Father, Son and Holy Spirit. While they are each separate and unique, they are all part of one whole.

As you look out from the Rock of Cashel to the Irish countryside, it’s easy to imagine what that day must have been like:

Ireland Allisons iPhone - 0136

For The Kids: Shamrock Collages
This week I told my 2 year old about St. Patrick. I told him how he was a man who lived a long, long time ago and that God used him to help other people learn about Jesus. We looked at pictures of shamrocks and I explained the trinity to little David using Patrick’s illustration. It was awesome!

Then the former-kindergarten teacher in me had to get crafty. We decided to commemorate our little shamrock “lesson” with a simple project.

I started by gathering an assortment of green things: scrapbooking paper, pom-poms, foam shapes, tissue paper and a large piece of green cardstock. I also put a dime-sized squirt of glue into a bowl with a Q-tip to use as a paintbrush:

IMG_1348

I used a pencil to draw a shamrock shape onto the cardstock (heavy construction paper or cardboard painted green would also work), then I cut out the shamrock:

IMG_1349

I sat David down at the table and gave him all of the green things I’d collected. He helped me tear the tissue paper into small pieces (this is great fine-motor practice, by the way!). Then I showed David how to use the Q-tip to “paint” glue onto the shamrock where he wanted to stick his green things. Whenever we’re using glue we use the mantra “just a dot, not a lot!”. David had a lot of fun picking out the decorations for his shamrock and sticking them on.

IMG_1355

He required quite a bit of supervision and direction (put the glue here…ok, now pick out another piece of paper..ok, now put the paper on top of the glue…please don’t lick the glue…). In the end, though, his little shamrock turned out pretty darn cute! And the best part of all: we’ll have something meaningful to think about this St. Patricks day.

IMG_1356

Quick and Easy Toddler Lunches

Feeding a toddler is difficult. They tend to be picky eaters, they eat on sporadic schedules, and they need a lot of assistance at meal time (I wonder at what point can I expect my child to safely wield a steak knife?). Lunch is always a bit of a struggle for me because it happens to fall right in the middle of the day between the time that I’ve just cooked and cleaned up breakfast and have to start prepping for dinner. I have, however, found a few tried-and-true lunches that are my go-to’s on busy days. Note: I always offer milk or water and at least two fruits and/or veggies with each meal. My 2-year old will always eat the fruit and, more often than not, he goes for the veggie, too. Here are some of my faves:

IMG_1346

  1. peanut butter and jelly sandwiches (when I’m feeling fancy, I’ll even make them into “t-balls”–use the top of a glass to cut out the sandwich bread into circles–and use string cheese to make the “T” and the “bat”. If you know my son, you know that this is about the coolest lunch in the world to him). 
  2. “deli tray”- cubes of lunch meat and cheeses
  3. breakfast foods: oatmeal, scambled eggs and toast, a muffin and yogurt–breakfast is usually my son’s favorite meal of the day, and who says you can only eat those things in the morning anyway?
  4. quesadillas with salsa “dip”
  5. anything on a stick: fruit, cheese cubes, chunks of meat, grilled veggies
  6. mac and cheese (yeah, it’s terrible but he loves it…)
  7. smoothies (you can sneak all kinds of good stuff into thesese guys!)
  8. leftovers from whatever we ate for dinner last night
  9. chicken nuggets and sweet potato fries
  10. pasta (he usually loves any kind of pasta)
  11. hummus with crackers, pita wedges and veggies for dipping
  12. tortilla roll ups (lay out a tortilla, spread on some cream cheese, layer on lunch meat/cheese/spinach/lettuce, roll up, and slice into rolls)
  13. grilled cheese and soup
  14. prepared tuna fish spread on crackers (or with goldfish crackers swimming in the tuna fish “sea”)
  15. healthy nachos (multigrain crackers baked with shredded cheese, beans, etc.)
  16. english muffin pizzas (1/2 a whole wheat english muffin spread with pizza sauce, topped with shredded mozzarella cheese and whatever toppings you like, then baked in the oven)
  17. “beanie-weenies”–baked beans with little hot dog pieces
  18. yogurt parfait (plain greek yogurt layered with granola, berries, and honey)
  19. mini whole-wheat bagels topped with peanut butter, bananas and a drizzle of honey
  20. “pigs in a blanket” (wrap a ‘lil smokies sausage or slice of turkey inside 1/3 of a crescent roll, then bake)

I’m always looking for new ideas, so feel free to leave a comment if you have any other great lunches!