Easter Lily Handprint Craft

image295

I enjoy making gifts for the important people in my kids’ lives. Just a little something to show that we’re thinking of them and that we are grateful for all that they do for us. Easter seemed like a worthy occasion, so David and I went to work.

I used to make these Easter lilies with my first graders every Spring after we read the book The Parable of the Lily. It’s a wonderful story about how something ordinary and unexpected (like a flower bulb) can turn into something beautiful (like a lily). The story parallels the Easter story and has a great message about grace and forgiveness.

Unfortunately I couldn’t find my copy of the book this week, but I thought it would still be a fun little project for us to do together while baby brother was napping. David is still pretty young to do a project like this, so I ended up doing most of it. He helped out wherever he could, though–his favorite parts seemed to be helping to trace his hand and trying out the hole punch. Here’s how we made the lilies if you want to give it a go!
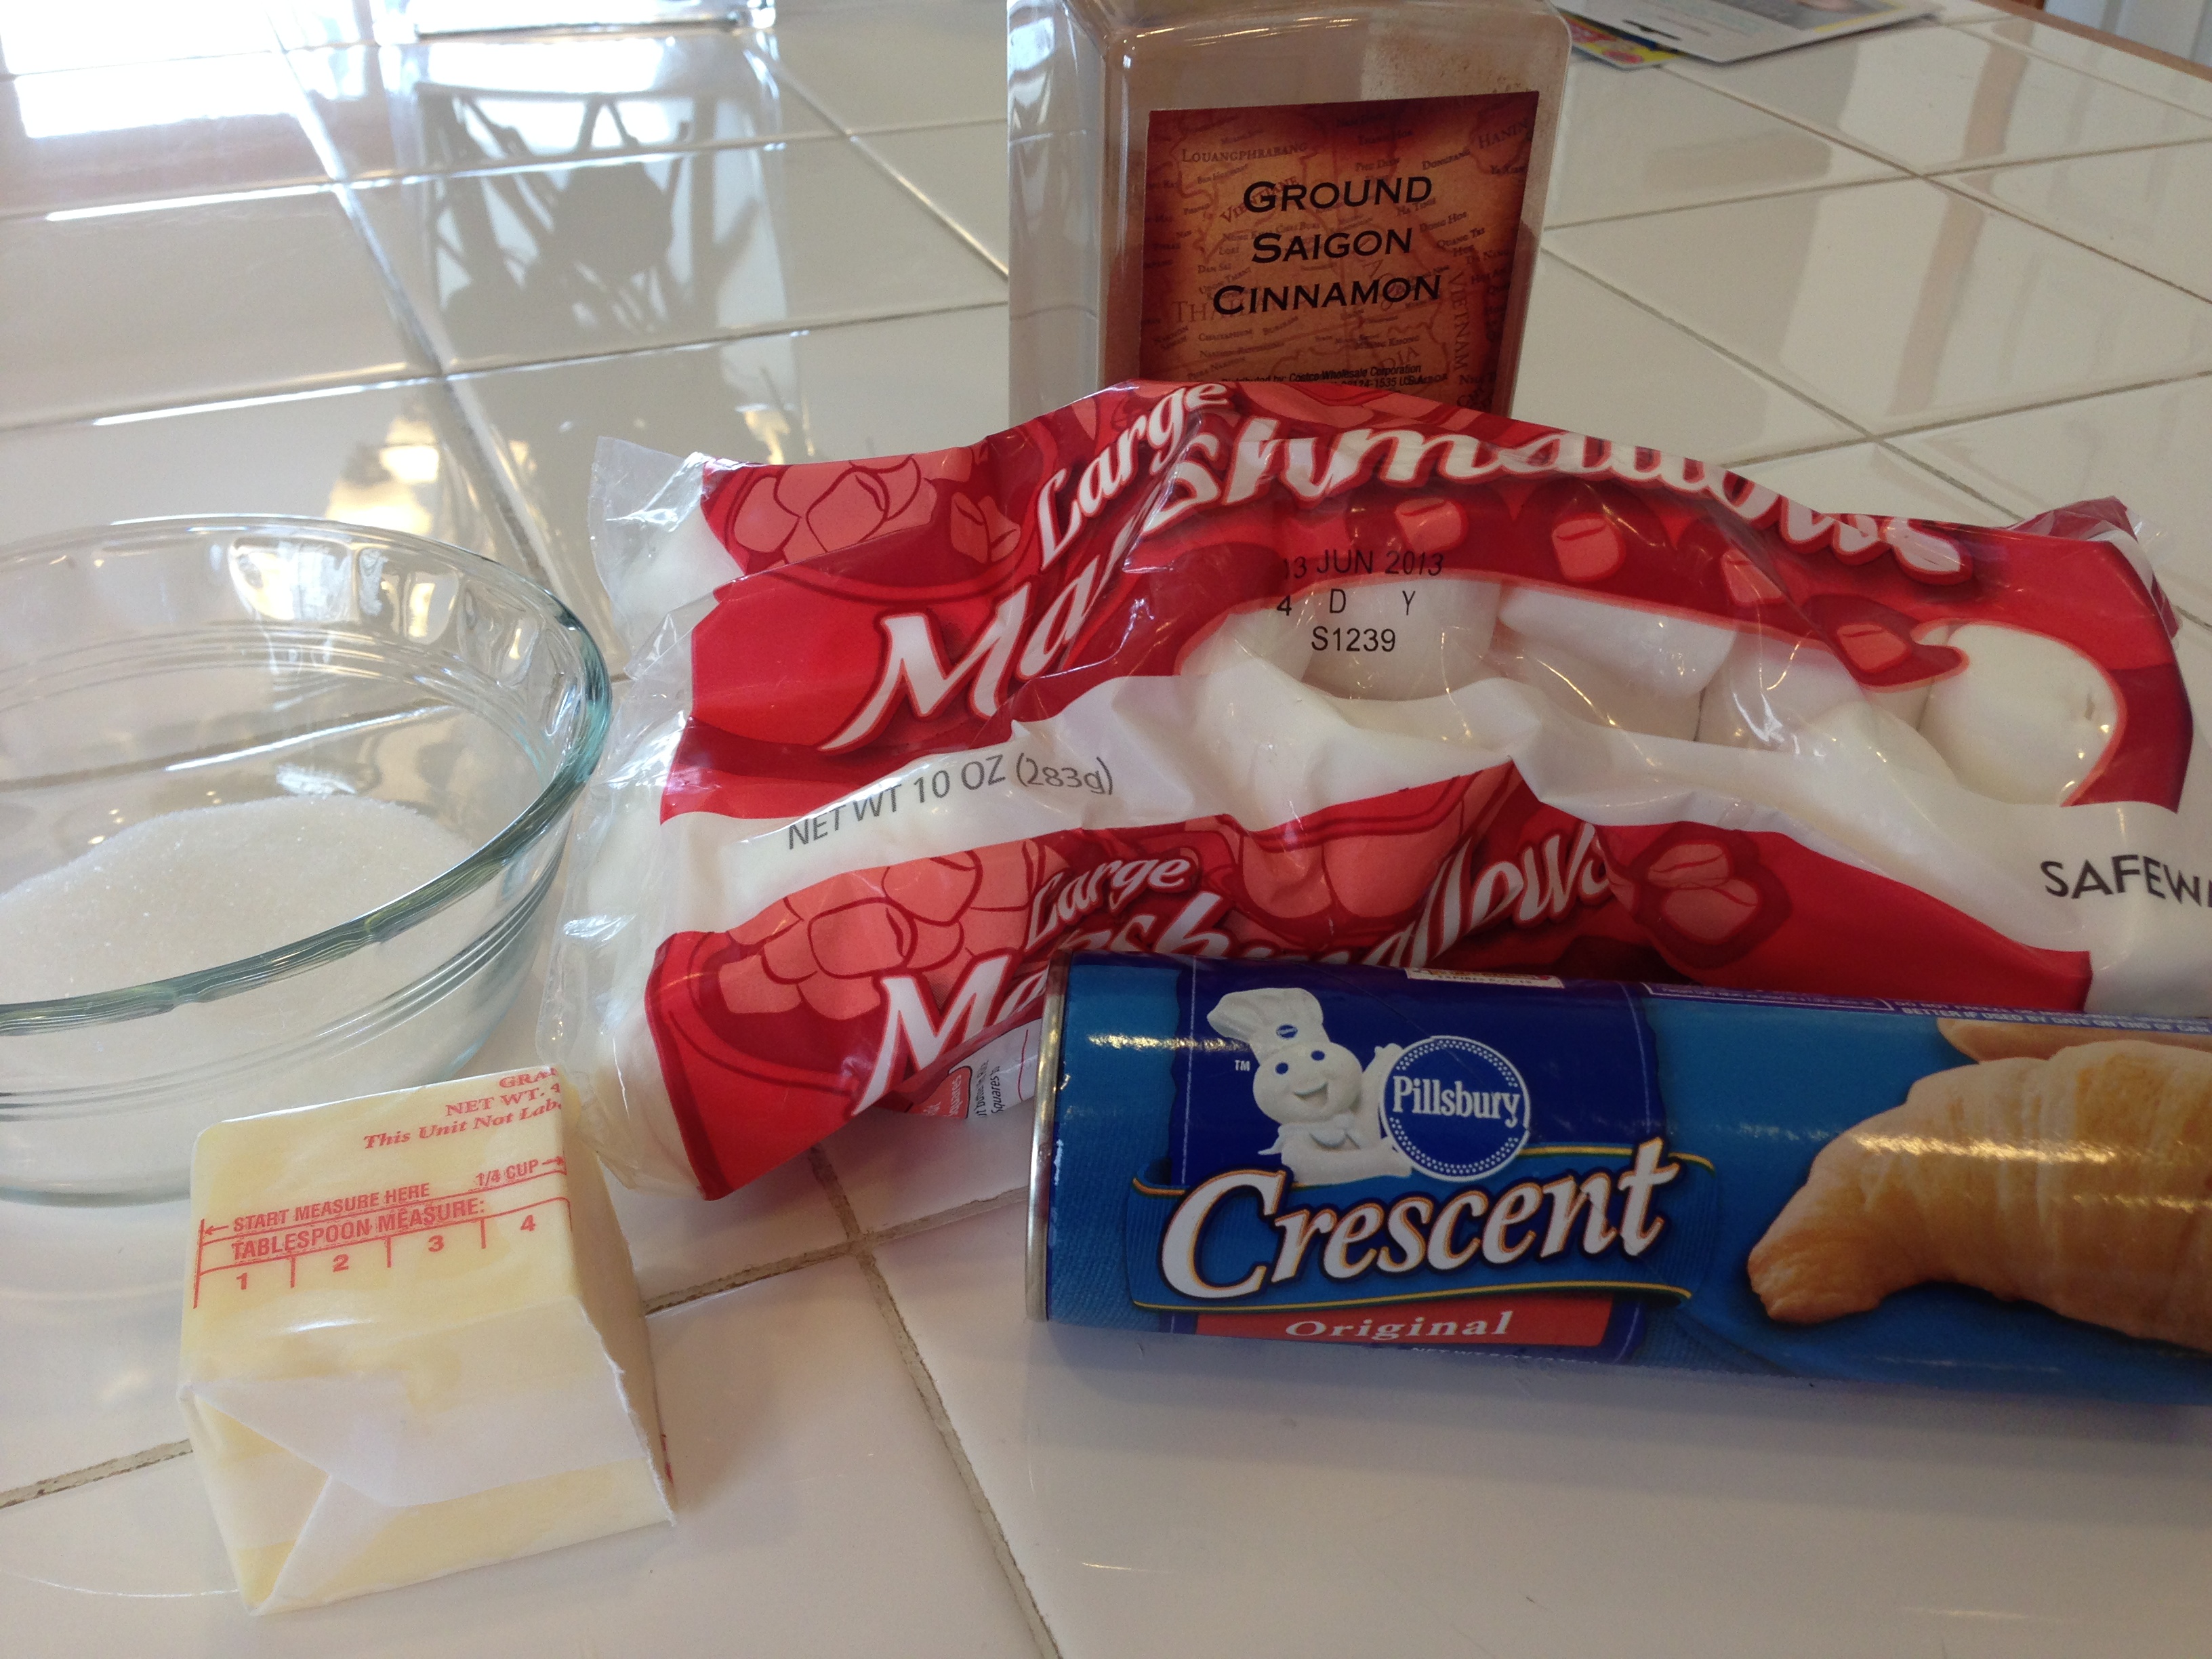
What you need:

  • white paper (I just used computer printer paper)
  • green paper (I used green copy paper, but construction paper or scrapbooking paper would work just as well)
  • small piece of yellow paper (or color a bit of paper yellow with a crayon)
  • crayon or pencil
  • scissors
  • tape
  • glue
  • hole punch

download (2)

What you do:

Trace your child’s hand onto the white paper. If you want to make more than one lily, you can fold the paper in half (or, if your child has tiny hands like mine, you can even fold it into quarters) before you trace so you can cut out multiple handprints from one piece of paper.

2-HandprintEasterLiliescraft

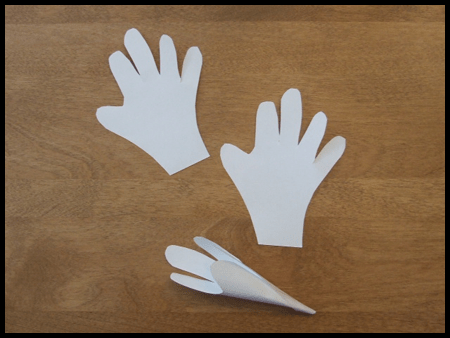
Use the scissors to cut out the handprint. Then, use a pencil to curl each finger down.Roll the handprint into a tube shape and secure with a piece of tape.

download (1)

Use the hole punch to cut out small circles of yellow paper. Glue the yellow dots into the inside of the white handprint flower.


Roll a tube out of a strip of green paper–this will be your flower stem (you can make it as long and as wide as you want). Secure your paper tube with a piece of tape. Cut out leaves from your green paper scraps and tape them onto the stem. Put a dollop of glue on the bottom of your flower (“runny” glue works better than a glue stick for this part) and set the flower on top of the stem. Let your flower dry completely.

If you want, you can finish off your flowers with a card.

hand_print_lily_l1

Here are a couple of ideas for the text of the card:

1.
This isn’t just a lily
as you can plainly see.

I made it with my hand,
which God made a part of me.

It comes with lots of love
especially to say,
I hope you have a very
special Easter Day!

2.
A piece of me I give to you,
I used my thumb and fingers too,
To make this lily just for you.
It doesn’t smell, it doesn’t grow,
I made it because He loves us so.
Remember that on Good Friday,
Jesus died to wash our sins away.
They buried Him and 3 days passed,
He arose on Easter Sunday at last.


Ta-da! A beautiful and simple craft that will brighten anybody’s Easter!


Resurrection Roll Recipe and Bible Story

I love finding creative ways to teach important truths to kids. And I love it even more if I can find a way to tie food into the “lesson”. You can imagine my excitement, then, when I first discovered Resurrection Rolls.

Basically, Resurrection Rolls are a treat that you make where each step of the cooking process represents part of the Easter story. It’s a wonderful way to tell kids the Easter story AND the rolls themselves are sublime. I’ve had people make the rolls for me before, but this was my first time doing the whole project with David. He was able to help out a bit and was pretty engaged the whole time (even if he did keep trying to swipe marshmallows from my stash). I’ll definitely be doing this again next year–a new tradition has been born!

What you’ll need:

IMG_1498

  • 1 package of crescent rolls
  • 8 large marshmallows (plus extras to snack on while you’re waiting for the rolls to bake!)
  • 3 Tablespoons melted butter
  • 3 Tablespoons sugar plus 1 Tablespoon cinnamon
  • Parchment paper
  • Baking sheet
  • Bible (or use the “script” below)

How It’s Done:

IMG_1513Start by preheating your oven to 350 degrees. While the oven is preheating, get out your Bible and open up to John 19 or find the Easter story in a children’s Bible (my favorite is the Jesus Storybook Bible). Below you’ll find the pictures and the “script” for how I told the story to David (he’s only 2 years old, so I kept it simple for him).

IMG_1509

Say: “Even though Jesus was perfect and had never sinned–he had never ever done anything wrong– some people did not like him. They wanted to hurt Jesus because he said he was God. They made Jesus carry a cross and they killed him. This made God very sad, but it was all part of His great rescue plan. When Jesus died, his friends took his body off the cross.”

IMG_1510

Do: Give your child a marshmallow
Say: “This marshmallow represents Jesus’ body. Jesus died for you and for me, because we have sinned and we need to be rescued from our sin.”

IMG_1512

Say: “After Jesus died, his friends came and they put special oil and spices on Jesus’ body to get him ready for burial.”
Do: Roll the marshmallow in melted butter, then in cinnamon sugar

Say: “Next, Jesus’ friends wrapped his body in special cloths–almost like a mummy! Jesus had died, and they were getting his body ready to bury.”
Do: Roll the cinnamon-sugar marshmallow up in a crescent roll (it won’t look like a crescent roll). Press all of the seams firmly. Repeat for each of the crescent rolls. Place the rolls on a parchment paper-lined baking sheet.

IMG_1511

Say: “Next, they laid Jesus’ body in a tomb. A tomb is like a big cave carved out of rock. Then big, strong soldiers rolled a heavy rock in front of the tomb so nobody could get in or out of the tomb. They even put a special seal over the entrance so they would know if anybody tried to move the rock that was in front of the entrance. Soldiers stood in front of the tomb to guard it day and night.”
Do: Put the rolls in the oven and set your timer for 10-12 minutes. Let the rolls bake until they are golden-brown. I even let David stand guard in front of our oven “tomb” with his toy sword.

IMG_1506

Say: “Jesus was dead in the tomb for three days. Let’s count to three: one, two, three. How many days was he in the tomb? That’s right, three days.”
(We had some time to wait for the rolls, so I let David play while they were baking. I kept going back to him, though, and we’d repeat this whole conversation about how long Jesus was in the tomb.)

IMG_1514

Do: When the rolls are done baking, take them out of the oven and let them cool (I let mine cool for about 20 minutes, and that was perfect). The marshmallow will probably have exploded out of your rolls, but that’s to be expected (that’s why we put down the parchment paper!). After the rolls have cooled…

IMG_1516

Say: “Three days after Jesus had died, an angel of God appeared to one of Jesus’ friends. He told her that Jesus was alive! Jesus’ friends decided to look in the tomb where they had put Jesus’ body, but when they did, it was empty! Jesus had risen! And still today, Jesus is alive. Today he lives in heaven with God.”
Do: Cut open one of the rolls. The marshmallow has melted, so the “tomb” is now empty.

IMG_1522

Do: Eat your yummy rolls!
Say: “These rolls are sweet, just like the love of God. God made you and he loves you very much. And some day, if you choose to love and follow God, you will be able to spend forever and ever in heaven with him and Jesus. The Bible tells us that Jesus is our Great Rescuer. The Bible tells us that the only way to Heaven is through loving and believing in Jesus. We celebrate Easter, because Jesus died and rose again so that we could have a way to Heaven.”

DIY Easter Resurrection Eggs

Easter is my favorite holiday. And it’s not because I like chocolate bunnies and tie-dyed eggs (even though I do like chocolate bunnies and tie-dyed eggs). I love Easter because I love Jesus, and Easter is the day He triumphed over Satan, sin and death. It is the day that we celebrate all that He has done for us: “…just as Christ was raised from the dead by the glory of the Father, we too might walk in newness of life.” Romans 6:4

It’s easy to lose sight of the true meaning of Easter with all of the commercialism that surrounds it in our culture (case in point: I just got an e-mail from our local mall inviting us out for photos with the Easter Bunny. The 6-foot tall “bunny” with beady little eyes looked pretty creepy in the photo. I don’t think we’ll be going). I want to make sure that my kids know why we celebrate Easter–that it’s not just another excuse to gorge on candy or trudge through the mud puddles looking for hidden surprises (at least, that’s what Easter egg hunts are like in Seattle). I want my kids to know that we celebrate Easter because of something amazing that Jesus did for them. I want them to know that it was a very hard thing for Jesus to do, but He did it because He loves them very, very much. He did it because He wants them to know Him and have a personal relationship with their Savior. And, hopefully, some day they will.

I’ve used Resurrection Eggs in the past to teach my students the Easter story. Basically you fill a dozen plastic eggs with small objects that correlate with Bible verses to tell the Easter story. You open one egg each day until Easter (starting 12 days out), read the verse, and look at the object inside the egg. By the end of the 12 days you’ve told the whole Easter story. It’s a wonderful tool to use with young children so I decided that I’d get a set of Resurrection Eggs for my own kids this year. I looked them up on Amazon and, lo and behold, they were $15! No, ma’am, I will not pay $15 for plastic eggs filled with trinkets. So, I went ahead and made my own. I already had all of the supplies at home and it took about 10 minutes to gather everything and put them together. Here’s what I put together if you want to make your own set of Resurrection Eggs to use with your little ones.

12 plastic Easter eggs. Any size and color will work just fine.

IMG_1420 12 objects that correlate with Bible verses. I used the following:

  • small leaf (symbolizing a plam branch) Matthew 21:9 “The crowds that went ahead of him and those that followed shouted, ‘Hosanna to the Son of David!’ ‘Blessed is he who comes in the name of the Lord!’ ‘Hosanna in the highest heaven!'”
  • nickel (symbolizing 30 silver coins) Matthew 26:14-15 “Then one of the Twelve—the one called Judas Iscariot—went to the chief priests 15 and asked, ‘What are you willing to give me if I deliver him over to you?’ So they counted out for him thirty pieces of silver.”
  • a piece of Chex cereal (symbolizing bread–you could use a small piece of bread or a cracker instead) Matthew 26:26 “While they were eating, Jesus took bread, and when he had given thanks, he broke it and gave it to his disciples, saying, ‘Take and eat; this is my body.'”
  • a “scroll” with Jesus’ prayer on it (symbolizing Jesus’ prayer in the Garden of Gethsemane) Matthew 26:39 “Going a little farther, he fell with his face to the ground and prayed, ‘My Father, if it is possible, may this cup be taken from me. Yet not as I will, but as you will.’”
  • rope (symbolizing the whips that scourged Jesus) Mark 15:15 “Wanting to satisfy the crowd, Pilate released Barabbas to them. He had Jesus flogged, and handed him over to be crucified.”
  • thorn (symbolizing Jesus’ crown of thorns. I used a clipping off my rose bush, but you could use a doll crown or a crown made out of tinfoil instead) Matthew 27:29 and then twisted together a crown of thorns and set it on his head. They put a staff in his right hand. Then they knelt in front of him and mocked him. ‘Hail, king of the Jews!’ they said.
  • nail (symbolizing the nails used in Jesus’ crucifixion) John 19: 16-17 “Finally Pilate handed him over to them to be crucified. So the soldiers took charge of Jesus. Carrying his own cross, he went out to the place of the Skull (which in Aramaic is called Golgotha).”
  • dice (symbolizing that the soldiers cast lots for Jesus’ clothing) Matthew 27:35 “When they had crucified him, they divided up his clothes by casting lots.”
  • toothpick (symbolizing the spear that pierced Jesus’ side) John 19:34 “Instead, one of the soldiers pierced Jesus’ side with a spear, bringing a sudden flow of blood and water.”
  • cloth (symbolizing Jesus’ burial clothes) Matthew 27:59 “Joseph took the body, wrapped it in a clean linen cloth”
  • Rock (symbolizing the stone that was rolled in front of Jesus’ tomb) Matthew 27:66 “So they went and made the tomb secure by putting a seal on the stone and posting the guard.”
  • nothing (OK, so this isn’t so much something as it is a lack of something–there is nothing in the last egg to symbolize the empty tomb!) Matthew 28:5-6 “The angel said to the women, ‘Do not be afraid, for I know that you are looking for Jesus, who was crucified. He is not here; he has risen, just as he said. Come and see the place where he lay. Then go quickly and tell his disciples: ‘He has risen from the dead and is going ahead of you into Galilee.There you will see him.’ Now I have told you.’”

IMG_1421 Bible I like using a physical Bible whenever I can with the little ones. I want them to learn that the Bible is God’s true written Word, and there is something special about having a physical book that they can see and touch and explore. I decided to keep a list of the verses I’ll be using for reference in my Bible and then I hi-lighted each verse in my Bible. I’ll show David the verse in my Bible each day and have him touch the words as I read them to him. IMG_1422 Box or Egg Carton For Storage I just used an empty egg carton to store my eggs in. I used a Sharpie marker to number the eggs 1-12 once I filled them, and then placed them in the correct order. IMG_1423 That’s it, we’re ready to go! This year I will begin using the Resurrection Eggs on Wednesday, March 20th (11 days before Easter so we can open egg #12 on Easter). If you want to do more than one egg per day, or even the whole box at once, go for it! The beauty of this activity is that you can go at your own pace and follow your child’s leading.

There’s also a great book that goes along with the Resurrection Eggs called Benjamin’s Box if you’re interested in some more enrichment.

Happy Easter: He is risen! He is risen indeed!