My kids are incredibly lucky. They have an amazing daddy who loves them with all of his heart. He does so much for all of us, and I want to make sure that he knows how much we appreciate him.
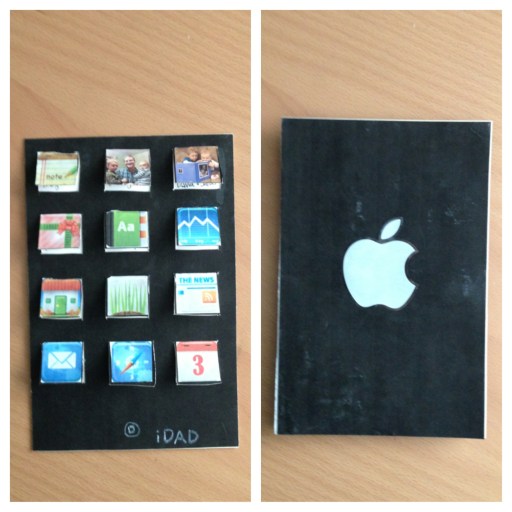
With Father’s Day coming up, I decided to make him an extra-special one-of-a-kind card that is suited just to him. Jon is, shall we say, a “techy” guy. He is an electrical engineer, so all things technology-oriented are right up his alley. He loves gadgets–and he loves no other gadgets more than his iDevices. This week I counted up the Apple devices currently in use in our house and we have 13 of them. THIRTEEN! Yes, the man loves his iThings. Nothing seemed more appropriate, then, than an Apple-inspired Father’s Day card.
I call this the “iDad” (kinda looks like an iPad…hehe!). This is not a totally original idea, but I thought it would make a cute Father’s Day (or birthday!) card. Here’s the how-to if you want to give it a try:
DIY iDad Father’s Day Card
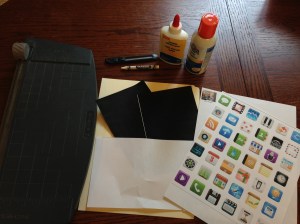
- 2 pieces each of black and white cardstock (Or you can do a cardstock hack like I did. I just printed off two black rectangles from my computer and glued them to old file folders. I glued plain white computer paper to the back side of the file folders and cut them out so that one side was black and the other side was white.)
- Paper cutter or scissors
- Xacto knife or box cutter (and a cutting mat or other cutting surface, NOT your nice dining room table!)
- white crayon or colored pencil
- standard white glue and/or spray adhesive glue
- app icons (I printed mine from this site. I just did a Google search for app icons and looked under images–there were lots of pictures to choose from. I also printed off some small photos of Jon and the boys that I cut down to the same size as the app icons.)
Directions:
- Glue your black and white cardstock back-to-back so one side is black and the other side is white. I used spray adhesive glue for this because it dries quickly, sticks better, and leaves no wrinkles, but standard glue would work just fine. After the glue has dried, cut each piece down to the same size (whatever size you want your card to be).
- Cut out the app icons you want to use and arrange them on top of one piece of black cardstock. I used 12 app icons on my card. Once you have them set up how you like them, glue each app icon into place.
- Use the white crayon to draw the home button under the app icons. If you want to, you can also put an apple on the other piece of black cardstock (I happened to have apple stickers lying around from one of our many Apple product purchases).
- Using an xacto knife, cut down the sides and bottom of each app icon so you can lift them from the bottom like a tab (do NOT cut the top of the app icon).
- After you have cut each app icon into a tab, glue the two pieces of cardstock together back-t0-back so the black side is showing on each side. Make sure you don’t put any glue on the back of the app icons! Put something heavy on top of the card and let it dry flat for a few hours.
- After your card is dry, lift each app icon tab and write a little Father’s Day sentiment. Under my tabs I wrote things like “Happy Father’s Day” (for the notes app), “We love you!” (for the photo of Jon with our boys), “You’re off the charts!” (for a stock quote app), and “Father’s Day: June 16, 2013” (for the calendar app).
- Present your card to Dad and watch his little techy heart melt!
To all of you amazing father’s out there, thank you for all that you do! Enjoy your special day, dads!


2 thoughts on “DIY iDad Father’s Day/Birthday Card For A Tech-Savvy Dad”